The following section describes the loading of the SAP extraction data into Snowflake environment.
Requirements #
The connection to the Snowflake target environment is made via the ODBC driver for Windows 64-bit architectures.
No additional installations are required to use the Snowflake destination.
- Download and install the SnowflakeDSIIDriver.
- To connect through a proxy server, configure the following environment variables:
http_proxy,https_proxy,no_proxy.
For more information, see Snowflake: ODBC Configuration and Connection Parameters. - The ODBC default port (443) for HTTPS is enabled and allows outbound traffic from the network to Snowflake’s services.
- The Snowflake account used to upload data to Snowflake needs the corresponding access and role privileges, see Snowflake Documentation: Overview of Access Control - Roles.
The following privileges are required:
- PUT command
- COPY command
- TABLE
Connection #
Adding a Destination #
- In the main window of the Designer, navigate to Server > Manage Destinations. The window “Manage Destinations” opens.
- Click [Add] to create a new destination. The window “Destination Details” opens.
- Enter a Name for the destination.
- Select the destination Type from the drop-down menu.
Destination Details #
General
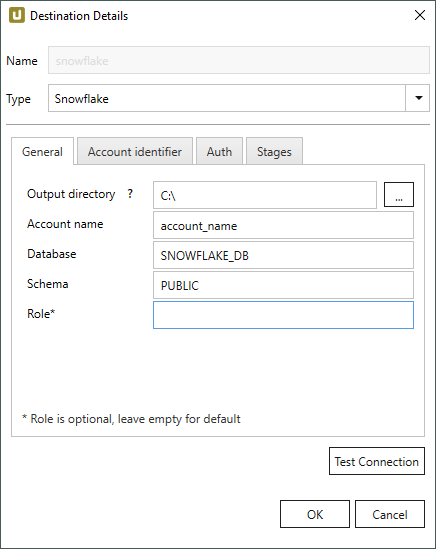
Output Directory
Enter an existing local directory in which the extracted data is written as a csv file.
Process during an extraction:
- A csv file is created in the output directory.
- Once the file has reached a certain size, it is zipped (gzip), see File Splitting.
- The zipped file is uploaded via PUT command to the Snowflake staging area.
- The data is then copied via COPY command to the target table in Snowflake.
This process (gzip + PUT command) repeats itself until the extraction is finished.
While running an extraction, the csv files in the local directory and the staging area are deleted.
Account Name
Enter the Snowflake authentication account.
The account name can be derived from the connection URL.
URL for organization account identifier: https://[organization]-[account_name].snowflakecomputing.com/console#/
URL for region account identifier (legacy): https://[account_name].[region].[cloud].snowflakecomputing.com/console#/
Database
Enter the name of the Snowflake database.
Schema
Enter the schema of the Snowflake database.
Role
Enter a Snowflake user role. If no user role is entered, the default user role is used for the connection.
Acount Identifier
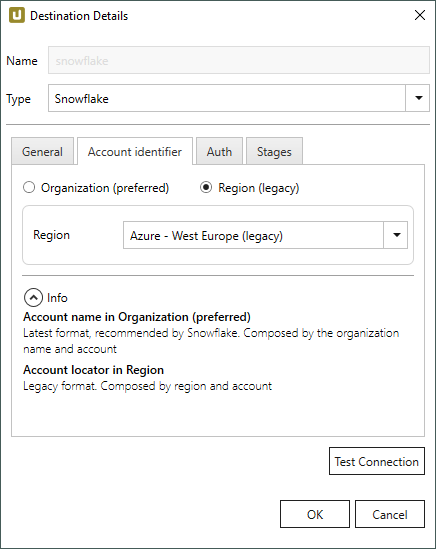
Organization (preferred)
Enter the name of your organization.
Authentication via the account name in your organization is the preferred way of identifying youself against Snowflake, see Snowflake Documentation: Account Name in Your Organization
Region (legacy)
Select the region of the Snowflake environment from the drop-down-menu.
In the example above, the region AWS - EU (Frankfurt) is selected.
The selected region must match the information in the assigned account.
Note: Regions with the suffix (legacy) are deprecated.
Select the (legacy) option if you connect to Snowflake using an old Cloud Region ID.
For more information on the current Cloud Region IDs, see Snowflake Documentation: Supported Cloud Regions.
Authentication
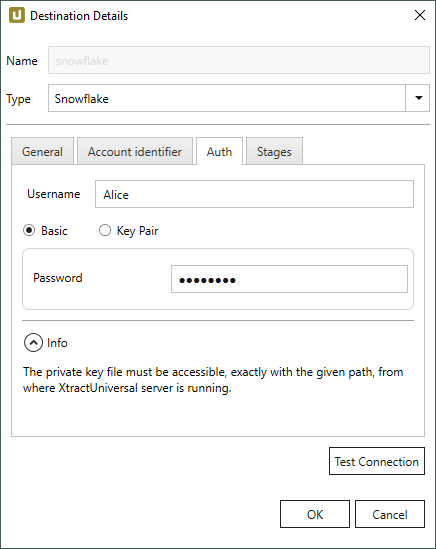
Username
Enter the Snowflake authentication user name.
Basic
If this option is active, basic authentication is used for authentication.
Enter the Snowflake authentication password of the user in the field Password.
Key Pair
If this option is active, key pairs are used for authentication, see Snowflake Documentation: Key Pair Authentication & Key Pair Rotation.
Select the path to your private key in the field Private Key Path. Both encrypted and non-encrypted private keys are supported. If you use encrypted private key for authentication, enter the password that is used by snowflake to decrypt it in the field Key password.
Stages
Click [Test Connection] to fetch all stages and warehouses from Snowflake. The stages and warehouses then become available for selection.
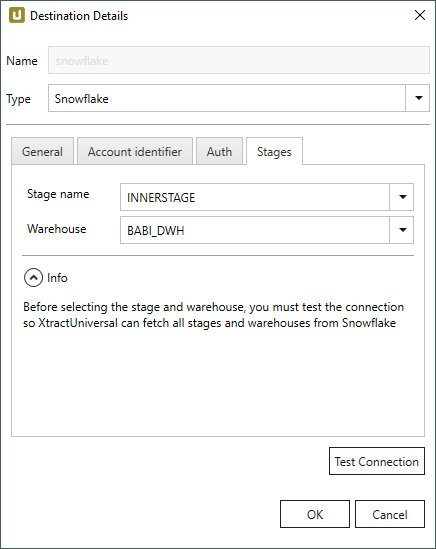
Stage name
Select a Snowflake Stage.
Note that only “internal” stages are supported.
Warehouse
Select a Snowflake Data Warehouse.
Settings #
Opening the Destination Settings #
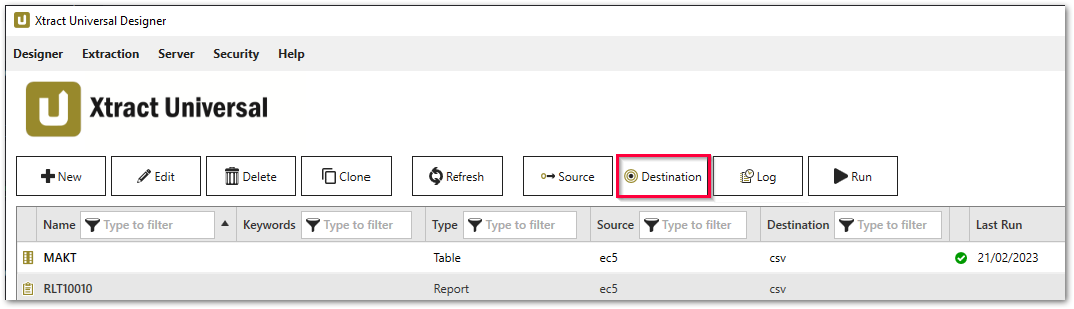
- Create or select an existing extraction, see Getting Started with Xtract Universal.
- Click [Destination]. The window “Destination Settings” opens.
The following settings can be defined for the destination:
Destination Settings #
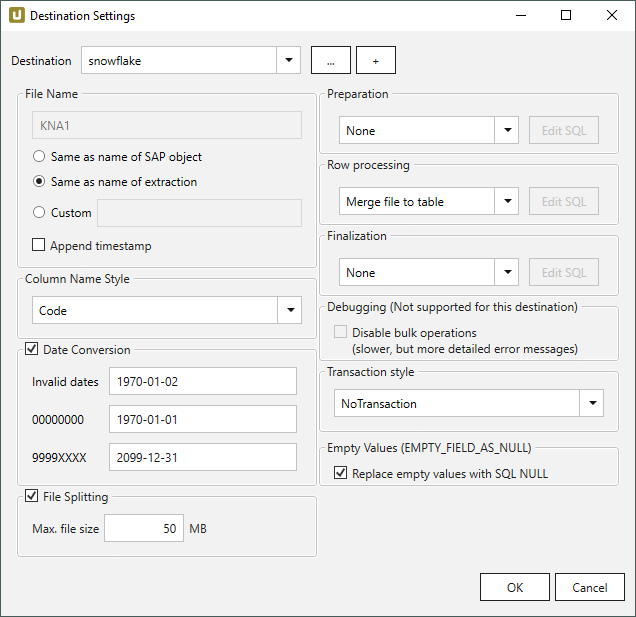
File Name #
File Name determines the name of the target table. You have the following options:
- Same as name of SAP object: Copy the name of the SAP object
- Same as name of extraction: Adopt name of extraction
- Custom: Define a name of your choice
- Append timestamp: Add the timestamp in the UTC format (_YYYY_MM_DD_hh_mm_ss_fff) to the file name of the extraction
Using Script Expressions as Dynamic File Names
Script expressions can be used to generate a dynamic file name. This allows generating file names that are composed of an extraction’s properties, e.g. extraction name, SAP source object. This scenario supports script expressions based on .NET and the following XU-specific custom script expressions:
| Input | Description |
|---|---|
#{Source.Name}# |
Name of the extraction’s SAP source. |
#{Extraction.ExtractionName}# |
Name of the extraction. If the extraction is part of an extraction group, enter the name of the extraction group before the name of the extraction. Separate groups with a ‘,’, e.g, Tables,KNA1, S4HANA,Tables,KNA1. |
#{Extraction.Type}# |
Extraction type (Table, ODP, BAPI, etc.). |
#{Extraction.SapObjectName}# |
Name of the SAP object the extraction is extracting data from. |
#{Extraction.Timestamp}# |
Timestamp of the extraction. |
#{Extraction.SapObjectName.TrimStart("/".ToCharArray())}# |
Removes the first slash ‘/’ of an SAP object. Example: /BIO/TMATERIAL to BIO/TMATERIAL - prevents creating an empty folder in a file path. |
#{Extraction.SapObjectName.Replace('/', '_')}# |
Replaces all slashes ‘/’ of an SAP object. Example /BIO/TMATERIAL to _BIO_TMATERIAL - prevents splitting the SAP object name by folders in a file path. |
#{Extraction.Context}# |
Only for ODP extractions: returns the context of the ODP object (SAPI, ABAP_CDS, etc). |
#{Extraction.Fields["[NameSelectionFiels]"].Selections[0].Value}# |
Only for ODP extractions: returns the input value of a defined selection / filter. |
#{Odp.UpdateMode}# |
Only for ODP extractions: returns the update mode (Delta, Full, Repeat) of the extraction. |
#{TableExtraction.WhereClause}# |
Only for Table extractions: returns the WHERE clause of the extraction. |
Column Name Style #
Defines the style of the column name. Following options are available:
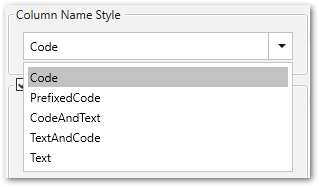
- Code: The SAP technical column name is used as column name in the destination e.g., MAKTX.
- PrefixedCode: The SAP technical column name is prefixed by SAP object name and the tilde character e.g., MAKT~MAKTX
- CodeAndText: The SAP technical column name and the SAP description separated by an underscore are used as column name in the destination e.g., MAKTX_Material Description (Short Text).
- TextAndCode: The SAP description and the SAP technical column name description separated by an underscore are used as column name in the destination e.g., Material Description (Short Text)_MAKTX.
- Text: The SAP description is used as column name in the destination e.g., Material Description (Short Text).
Date conversion #
Convert date strings
Converts the character-type SAP date (YYYYMMDD, e.g., 19900101) to a special date format (YYYY-MM-DD, e.g., 1990-01-01). Target data uses a real date data-type and not the string data-type to store dates.
Convert invalid dates to
If an SAP date cannot be converted to a valid date format, the invalid date is converted to the entered value. NULL is supported as a value.
When converting the SAP date the two special cases 00000000 and 9999XXXX are checked at first.
Convert 00000000 to
Converts the SAP date 00000000 to the entered value.
Convert 9999XXXX to
Converts the SAP date 9999XXXX to the entered value.
File Splitting #
File Splitting
Writes extraction data of a single extraction to multiple files in the cloud.
Each filename is appended by _part[nnn].
Max. file size
The value set in Max. file size determines the maximum size of each stored file.
Note: The option Max. file size does not apply to gzip files. The size of a gzipped file cannot be determined in advance.
Preparation - SQL Commands #
Defines the action on the target database before the data is inserted into the target table.
- Drop & Create: Remove table if available and create new table (default).
- Truncate Or Create: Empty table if available, otherwise create.
- Truncate: Empty table if available.
- Create If Not Exists: Create table if not available.
- None: no action
- Custom SQL: Here you can define your own script. See the Custom SQL section below.
If you only want to create the table in the first step and do not want to insert any data, you have two options:
- Copy the SQL statement and execute it directly on the target data database.
- Select the None option for Row Processing and execute the extraction.
Once the table is created, it is up to you to change the table definition, by, for example, creating corresponding key fields and indexes or additional fields.
Row Processing - SQL Commands #
Defines how the data is inserted into the target table.
- None: no action.
- Copy file to table: Insert records (default).
- Merge File to table: Insert records into the staging table.
- Custom SQL: Here you can define your own script. See the Custom SQL section below.
Finalization - SQL Commands #
Defines the action on the target database after the data has been successfully inserted into the target table.
- None: no action (default).
- Custom SQL: Here you can define your own script. See the Custom SQL section below.
About Merging
Merging ensures delta processing: new records are inserted into the database and / or existing records are updated. See section Merging Data.
Custom SQL #
Custom SQL option allows creating user-defined SQL input. Existing SQL commands can be used as templates:
- Within subsection e.g., Preparation select the Custom SQL (1) option from the drop-down list.
- Click [Edit SQL]. The window “Edit SQL” opens.
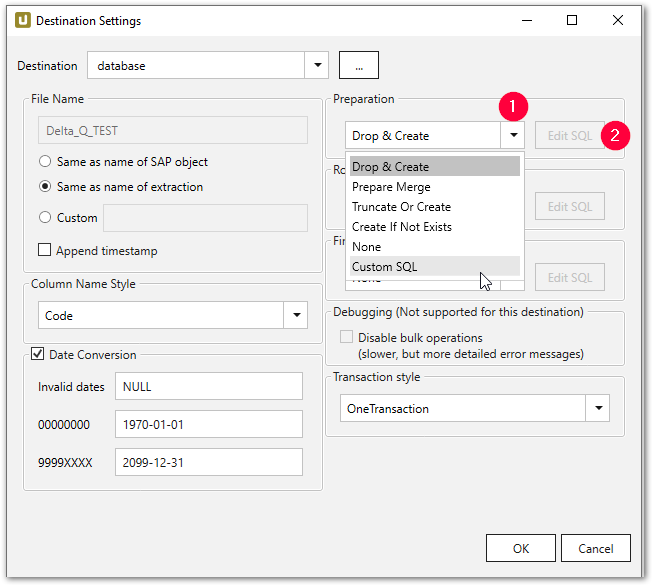
- Navigate to the drop-down menu and select an existing command (3).
- Click [Generate Statement]. A new statement is generated.
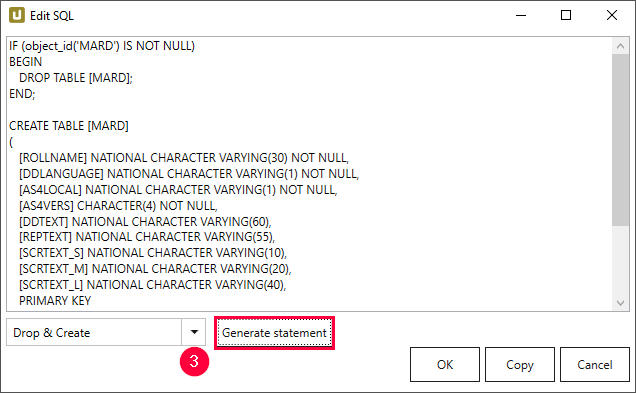
- Click [Copy] to copy the statement to the clipboard.
- Click [OK] to confirm.
Templates
You can write your user-defined SQL expressions and adapt the loading of the data to your needs.
You can additionally execute stored procedures that exist in the database.
To do so, use the SQL templates provided in the following phases:
- Preparation (e.g., Drop & Create or Create if Not Exists)
- Row Processing (e.g., Merge)
- Finalization
Note: For more information on custom SQL statements, see Custom SQL.
Transaction style #
Note: The available options for Transaction Style vary depending on the destination.
One Transaction
Preparation, Row Processing and Finalization are all performed in a single transaction.
Advantage: clean rollback of all changes.
Disadvantage: possibly extensive locking during the entire extraction period.
It is recommended to only use One Transaction in combination with DML commands, e.g., “truncate table” and “insert. Using DDL commands commits the active transaction, causing rollback issues for the steps after the DDL command. Example: If a table is created in the preparation step, the opened “OneTransaction” is committed and a rollback in the next steps is not performed correctly. For more information, see Snowflake Documentation: DDL Statements.
Three Transactions
Preparation, Row Processing and Finalization are each executed in a separate transaction.
Advantage: clean rollback of the individual sections, possibly shorter locking phases than with One Transaction (e.g. with DDL in Preparation, the entire DB is only locked during preparation and not for the entire extraction duration).
Disadvantage: No rollback of previous step possible (error in Row Processing only rolls back changes from Row Processing, but not Preparation).
RowProcessingOnly
Only Row Processing is executed in a transaction. Preparation and Finalization without an explicit transaction (implicit commits).
Advantage: DDL in ‘Preparation* and Finalization for DBMS that do not allow DDL in explicit transactions (e.g. AzureDWH)
Disadvantage: No rollback of Preparation/Finalization.
No Transaction
No explicit transactions.
Advantage: No transaction management required by DBMS (locking, DB transaction log, etc.). This means no locking and possible performance advantages.
Disadvantage: No rollback
Empty Values #
Warning! NULL result in a non-nullable column. By default empty strings are converted to NULL values when uploading data to Snowflake. To deactivate the conversion, disable Replace empty values with SQL NULL.
Replace empty values with SQL NULL
This option controls the Snowflake file format parameter EMPTY_FIELD_AS_NULL.
If Replace empty values with SQL NULL is active, empty strings are converted to NULL values when uploading data to Snowflake.
Merging Data #
The following example depicts the update of the existing data records in a database by running an extraction to merge data. Merging in this case stands for changing a value of a field or inserting a new data row or updating an existing record.
Alternatively to merging, the data can be also updated by means of full load. The full load method is less efficient and performant.
Prerequisite for merging is a table with existing data, in which new data should be merged.
Ideally, the table with existing data is created in the initial load and filled with data using the Row Processing option Merge file to table.
Warning! Faulty merge
A primary key is a prerequisite for a merge command. If no primary key is set, the merge command runs into an error.
Create an appropriate primary key in the General Settings to execute the merge command.
Updated record in SAP #
A field value within an SAP table is updated. With a merge command the updated value is written to the destination database table.
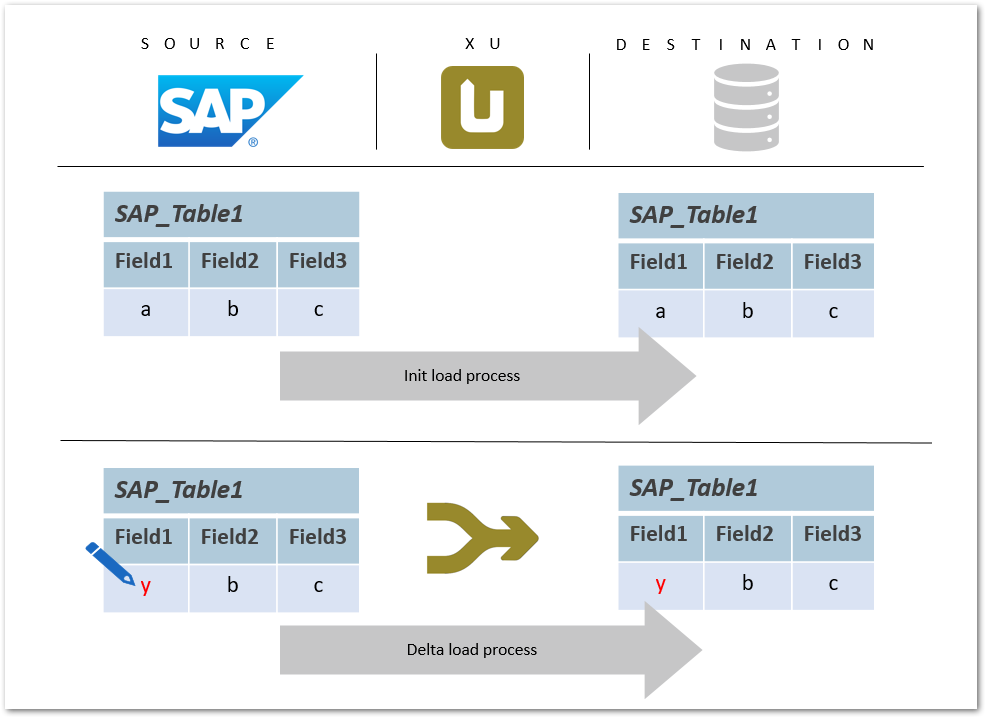
The merge command ensures delta processing: new records are inserted into the database and / or existing records are updated.
Merge command in Xtract Universal #
The merge process is performed using a staging table and takes place in three steps. In the first step, a temporary table is created in which the data is inserted in the second step. In the third step, the temporary table is merged with the target table and then the temporary table is deleted.
- In the main window of the Designer, select the respective extraction and click [Destination]. The window “Destination Settings” opens.
- Make sure to choose the correct destination: a database destination.
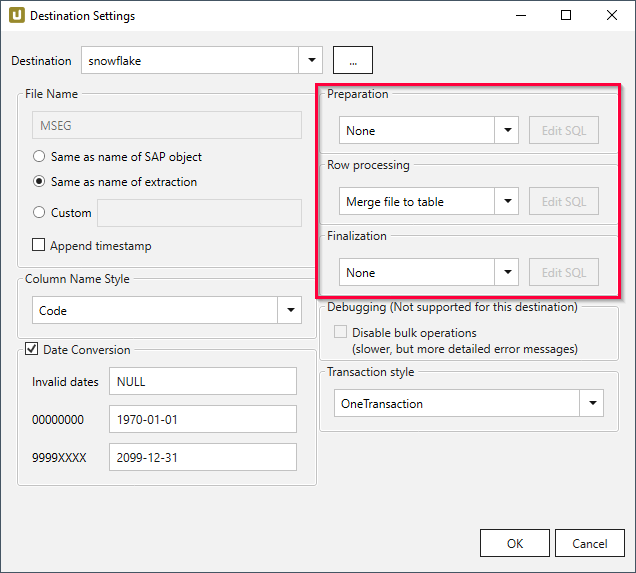
- Navigate to the right part of the “Destination Settings” window and apply the following settings:
- Preparation: None
- Row Processing: Merge file to table to add data to the staging table.
- Finalization: None
More information about the updated fields can be found in the SQL statement (Custom SQL only).
It is possible to edit the SQL statement if necessary, e.g., to exclude certain columns from the update.
Fields that do not appear in the SQL statement are not affected by changes.
Custom SQL #
Custom SQL Statement #
In the window Destination settings, you can use a custom SQL statement for the three different database process steps and / or to adapt the SQL statement to your requirements.
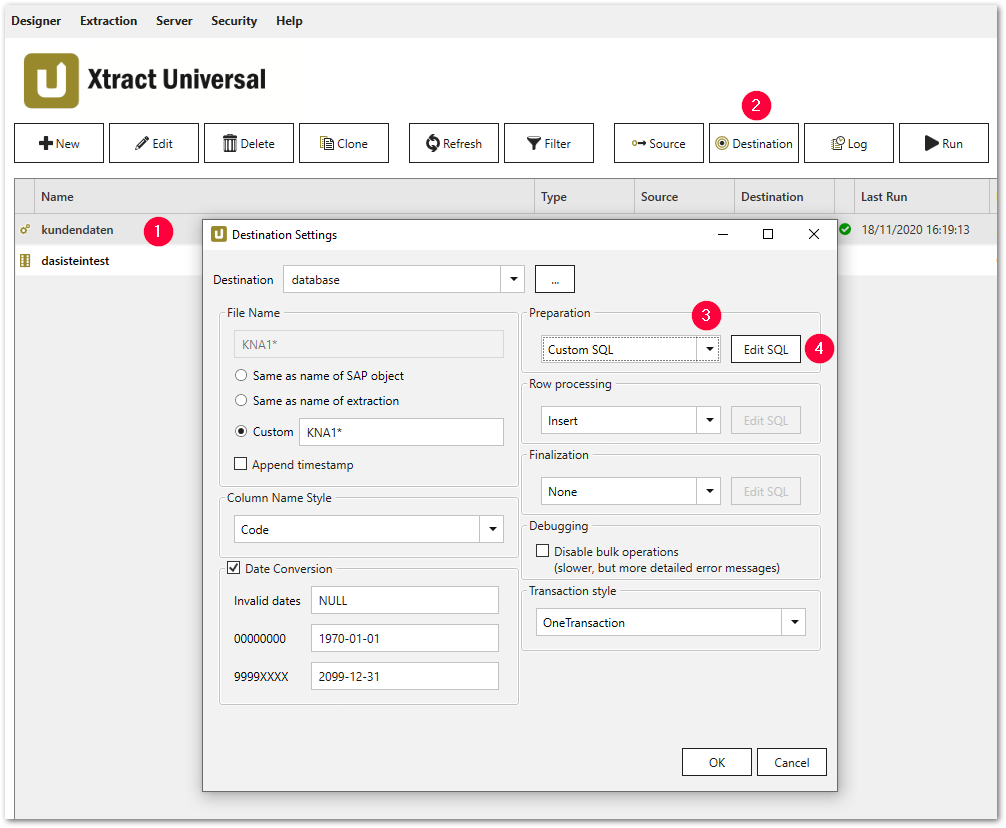
- Select a particular extraction (1).
- Click [Destination] (2). The window “Destination Settings” opens.
- Select the option Custom SQL from the drop-down list (3) in one of the following sections:
- Preparation
- Row Processing
- Finalization
- Click [Edit SQL] (4). The window “Edit SQL” opens.
Custom SQL Example #
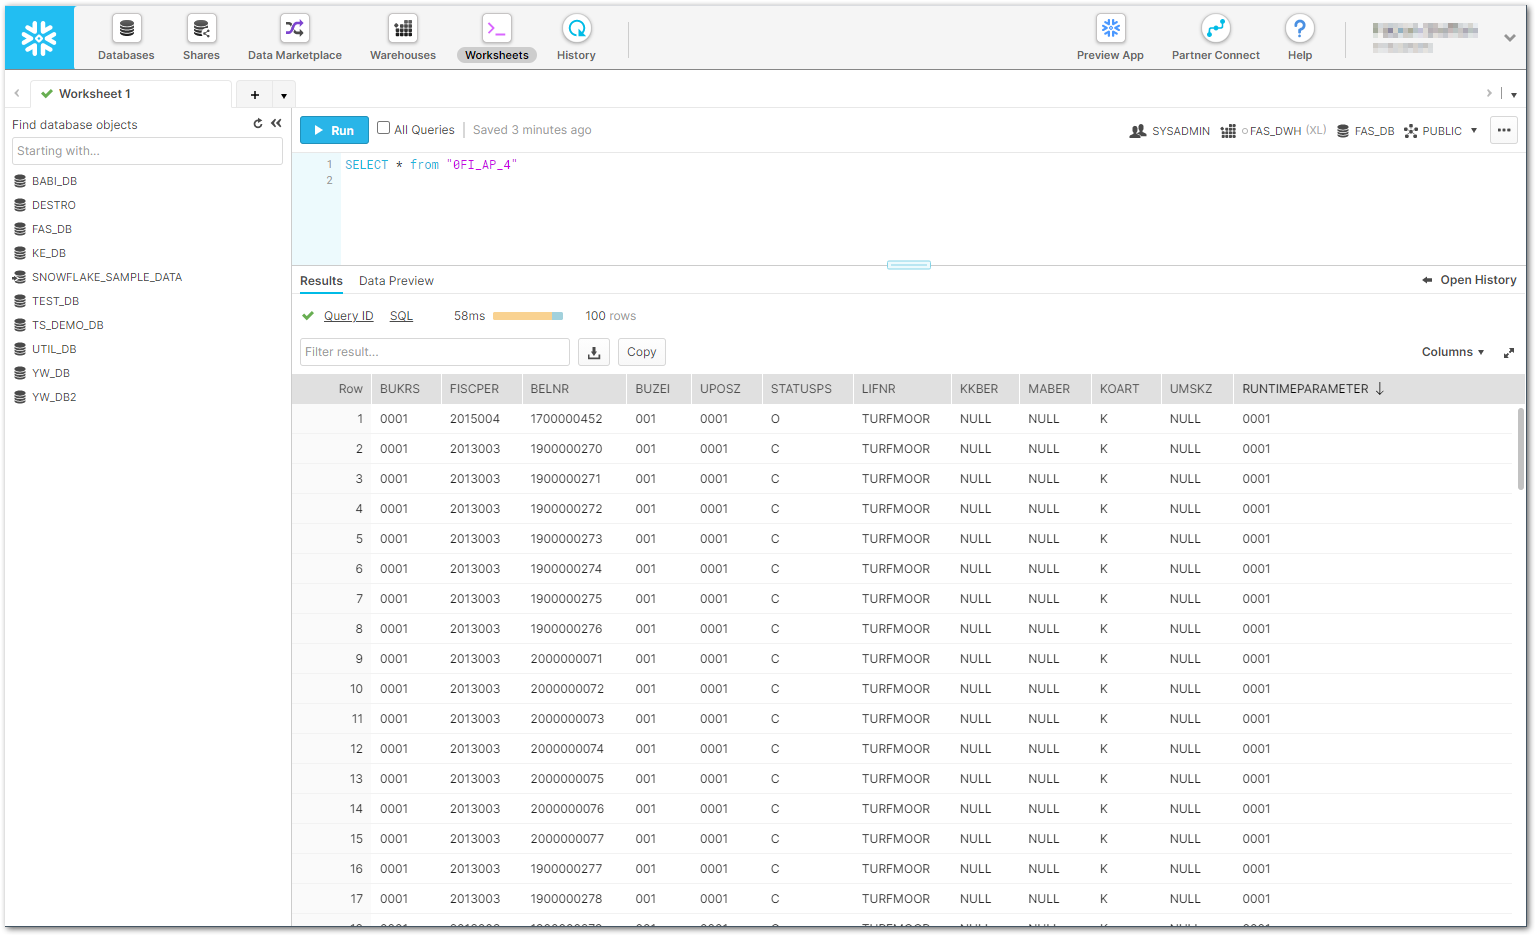
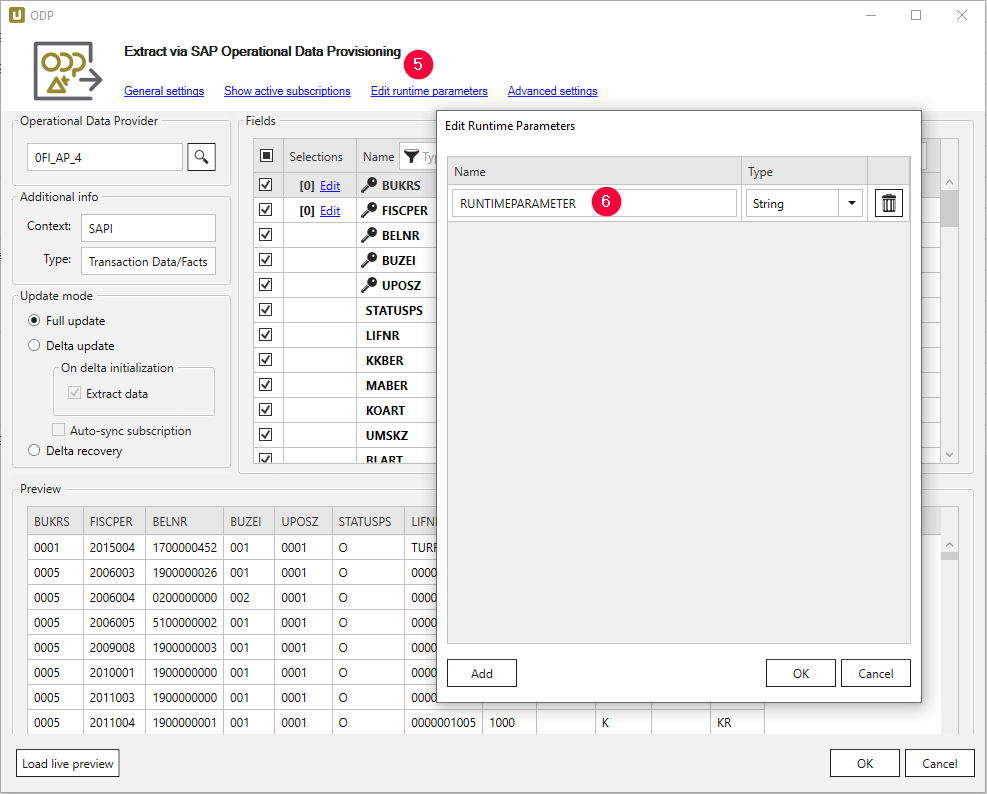
In the following example, the DataSource 0FI_AP_4 is extended by one column that is filled with the user-defined runtime parameter RUNTIMEPARAMETER.
The filling of the new column is implemented dynamically in the Finalization section of the destination settings.
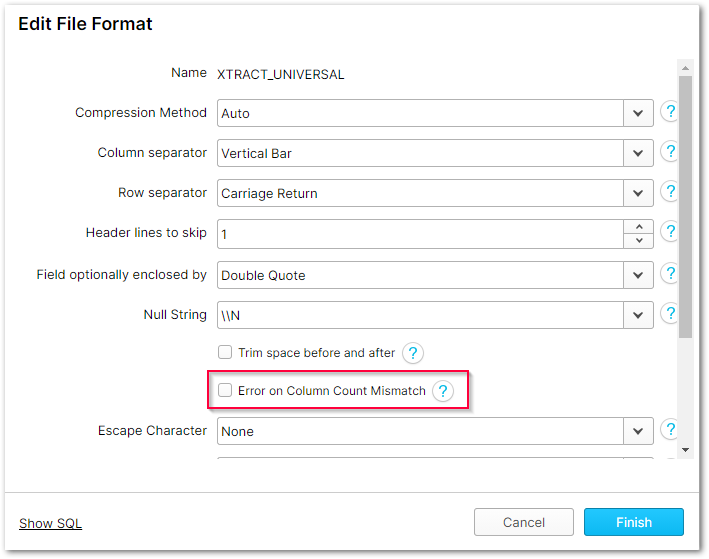
- Deselect the Error on Column Count Mismatch option in the XTRACT_UNIVERSAL File Format.
- Create the runtime parameter RUNTIMEPARAMETER via Edit runtime parameter (5).
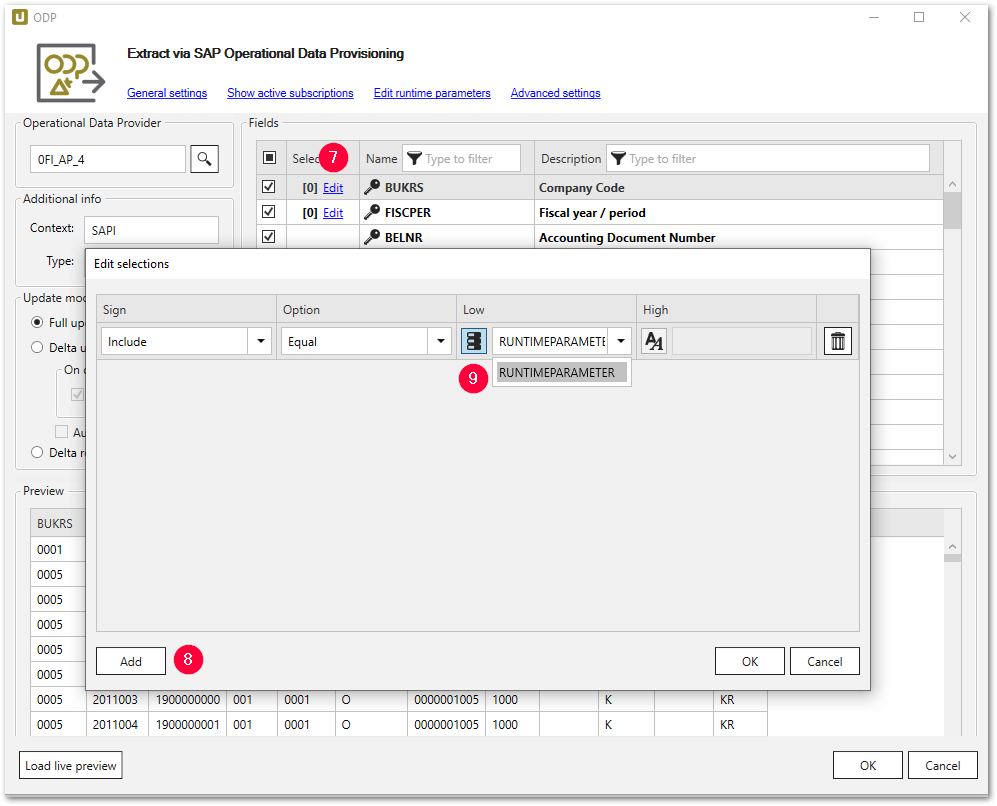
- Store the runtime parameter via Edit in the column Selections (7).
- Navigate to the the Destination Settings and select Custom SQL in the Preparation section. Click Edit SQL.
- Select Drop & Create from the drop-down menu and click [Generate Statement] (10).
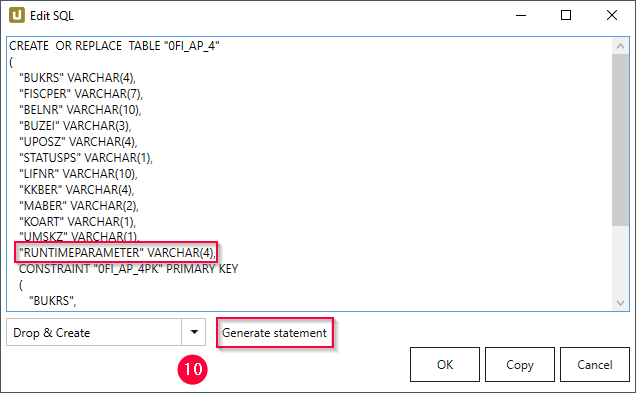
- Add the following line to the generated statement.
"RUNTIMEPARAMETER" VARCHAR(4), - Confirm with [OK].
- In the Row Processing section, the column values from SAP are processed into a local CSV file.
This SQL statement is therefore left at the default Copy file to table.
At this point, no data from the SAP source system butNULLvalues are written to the newly created column RUNTIMEPARAMETER. - In the Finalization section, the
NULLvalues are filled with the following SQL statement of the runtime parameter RUNTIMEPARAMETER and written into the SQL target table by the T-SQL commandUPDATE.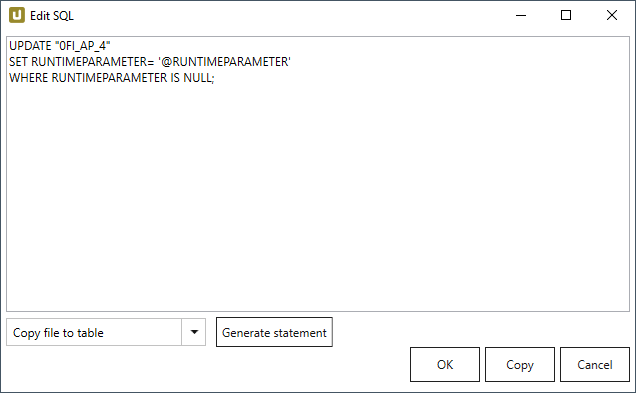
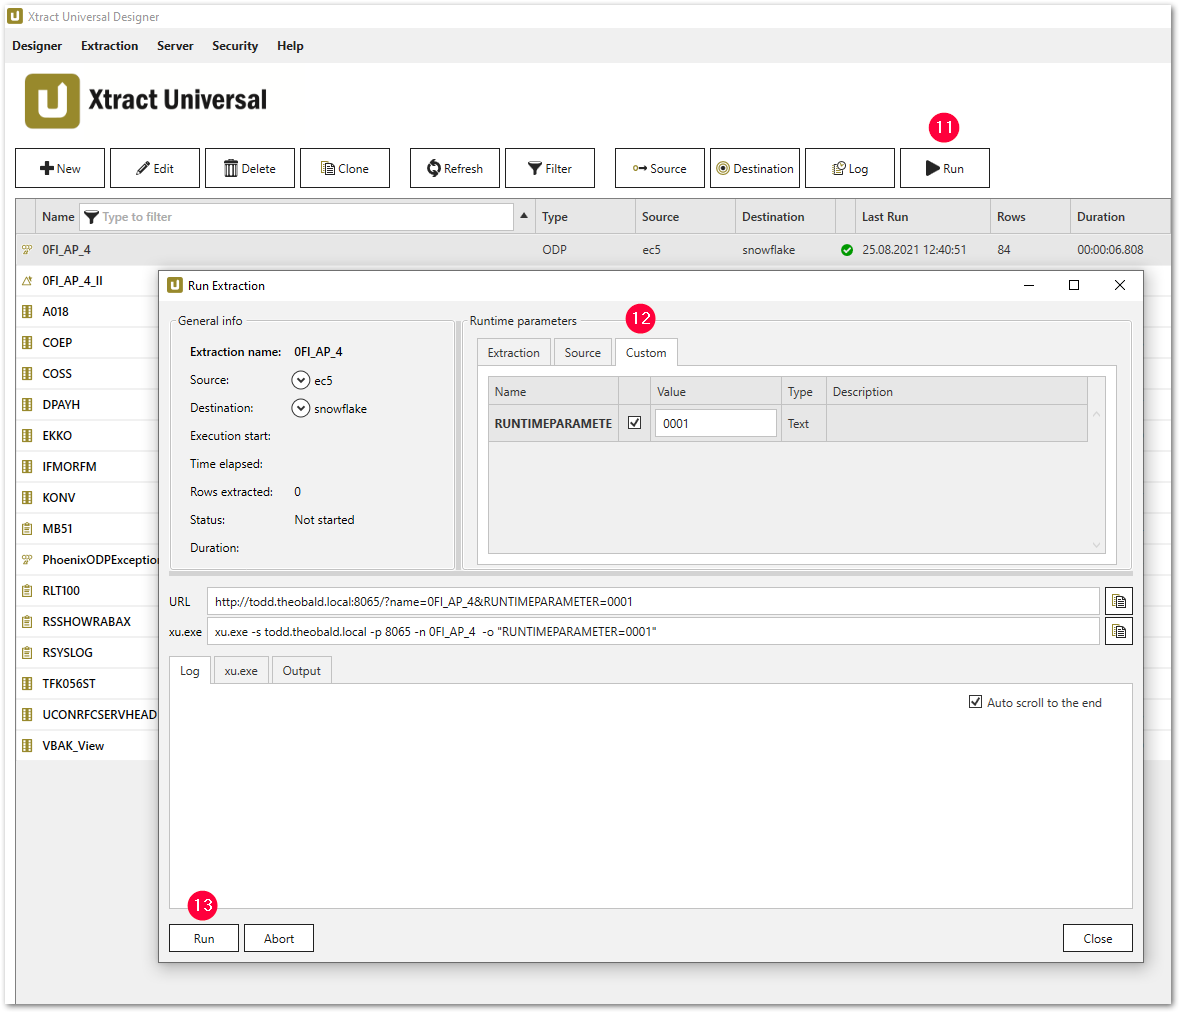
UPDATE "0FI_AP_4" SET RUNTIMEPARAMETER= '@RUNTIMEPARAMETER' WHERE RUNTIMEPARAMETER IS NULL; - Run the extraction via Run (11) and specify a suitable value for the runtime parameter (12).
Checking the Result #
Check the existence of the new column RUNTIMEPARAMETER in the Snowflake Console of the table 0FI_AP_4.