The following section describes the usage of Xtract Universal for SAP integration in Power BI Report Server (SSRS).
Requirements #
To use the Power BI Report Server destination, you need the following components:
- Visual Studio 2017 or higher
- the Microsoft Reporting Services Projects plugin (version 2.6.11 or higher) for Visual Studio.
- Power BI Report Server (January 2020 or later)
- Xtract Universal (version 4.29 or higher)
- to use Transport Layer Security, it is necessary to modify the Registry of the machine that runs the SSRS server according to the Microsoft Help (Configure Strong cryptography)
Note: The Power BI Report Builder is not supported.
Installation #
To use the Power BI Report Server destination, install the Microsoft Reporting Services Projects plugin in Visual Studio. After the installation is complete, close Visual Studio.
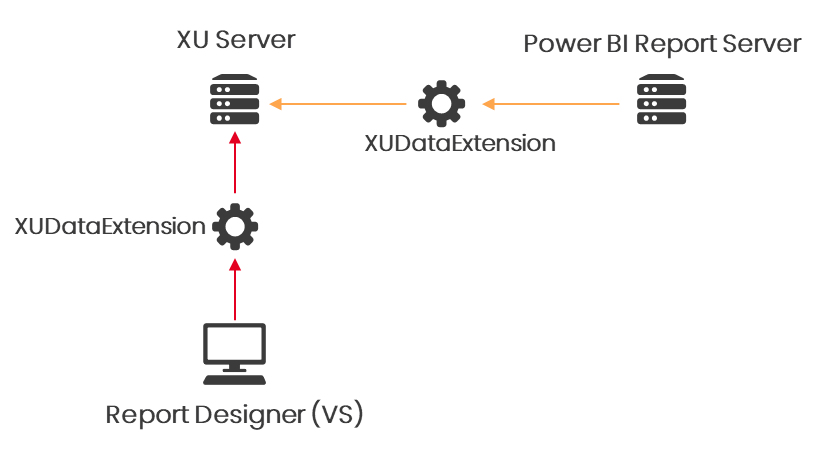
Microsoft Power BI Report Server (SQL Server Reporting Services) supports a wide variety of data sources out of the box. To add Xtract Universal to the list of data sources, install the Xtract Universal Report Server Plugin for Visual Studio and the Report Server. The plugin must be installed on both environments to consume the data extracted by Xtract Universal, see graphic below:
To complete the installation close all Visual Studio windows.
Warning! Make sure to install the latest version of the Microsoft Reporting Services Projects plugin and Xtract Universal.
Installation using the Xtract Universal Report Server Plugin #
The Xtract Universal Report Server Plugin can be installed as part of the Xtract Universal Setup.
To install the Xtract Universal Report Server Plugin on multiple environments without installing the Xtract Universal Designer, follow the steps below:
- Make sure the Microsoft Reporting Services Projects plugin for Visual Studio is installed and active.
- Close Visual Studio.
- Install Xtract Universal on the environment on which the license runs.
- Download the XtractUniversalReportServerPluginSetup.exe.
- Run the XtractUniversalReportServerPluginSetup.exe on any environment that uses Visual Studio to design reports or where the Report Server runs.
This installs the Xtract Universal Report Server Plugin on all compatible versions of Visual Studio and/or Report Server found on the environment.

- After the installation on the Report Server is complete, restart the Report Server for the changes to take effect. You can restart the server in the Report Server Configuration Manager by clicking [stop] and then [start].
Note: If the Reporting Services Projects plugin for Visual Studio is updated, the Xtract Universal Report Server Plugin is not available anymore. The Report Server Plugin must be reinstalled.
After installation of Xtract Universal Report Server Plugin the following entries and extensions are available in the Visual Studio installation directory:
C:\Program Files (x86)\Microsoft Visual Studio\2019\Enterprise\Common7\IDE\CommonExtensions\Microsoft\SSRS\XUDataExtension2020.05.dllC:\Program Files (x86)\Microsoft Visual Studio\2019\Enterprise\Common7\IDE\CommonExtensions\Microsoft\SSRS\Theobald.Common.dllC:\Program Files (x86)\Microsoft Visual Studio\2019\Enterprise\Common7\IDE\CommonExtensions\Microsoft\SSRS\Theobald.Distillery.Common.dllC:\Program Files (x86)\Microsoft Visual Studio\2019\Enterprise\Common7\IDE\CommonExtensions\Microsoft\SSRS\Theobald.Net.dllC:\Program Files (x86)\Microsoft Visual Studio\2019\Enterprise\Common7\IDE\CommonExtensions\Microsoft\SSRS\RSReportDesigner.config
Connection #
Adding a Destination #
- In the main window of the Designer, navigate to Server > Manage Destinations. The window “Manage Destinations” opens.
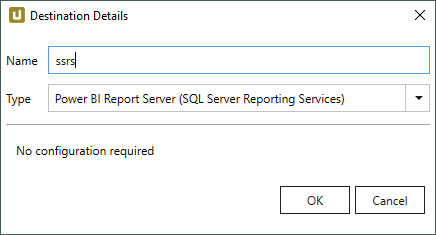
- Click [Add] to create a new destination. The window “Destination Details” opens.
- Enter a Name for the destination.
- Select the destination Type from the drop-down menu.
Destination Details #
To use the Power BI Report Server destination, no further settings have to be made.
Settings #
Opening the Destination Settings #
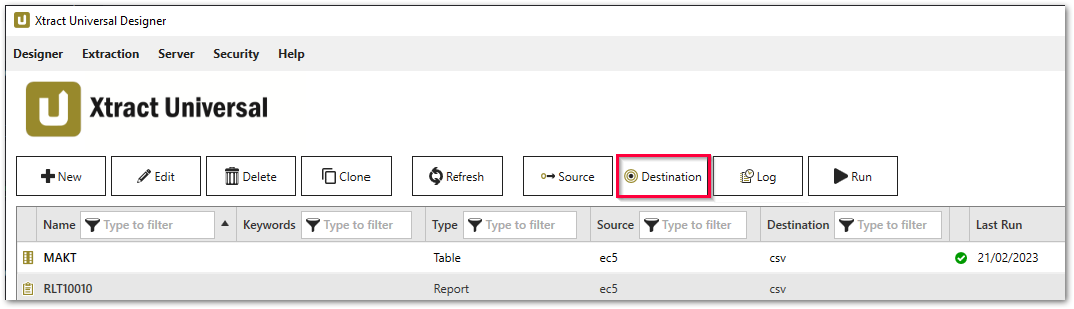
- Create or select an existing extraction, see Getting Started with Xtract Universal.
- Click [Destination]. The window “Destination Settings” opens.
The following settings can be defined for the destination:
Destination Settings #
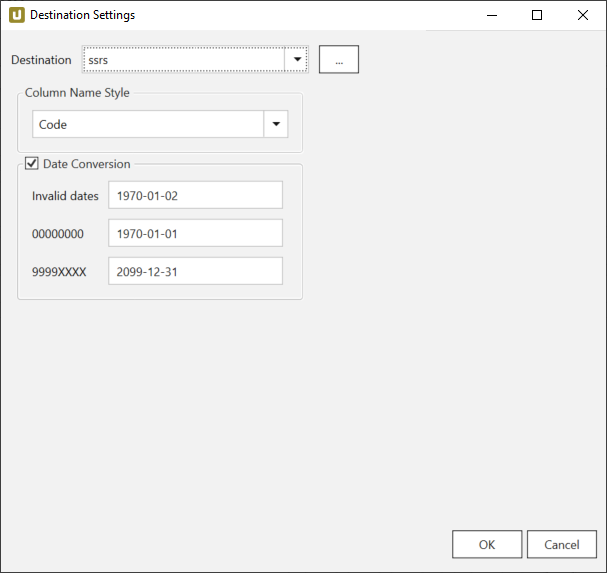
Column Name Style #
Defines the style of the column name. Following options are available:
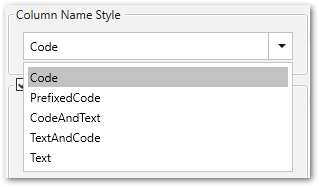
- Code: The SAP technical column name is used as column name in the destination e.g., MAKTX.
- PrefixedCode: The SAP technical column name is prefixed by SAP object name and the tilde character e.g., MAKT~MAKTX
- CodeAndText: The SAP technical column name and the SAP description separated by an underscore are used as column name in the destination e.g., MAKTX_Material Description (Short Text).
- TextAndCode: The SAP description and the SAP technical column name description separated by an underscore are used as column name in the destination e.g., Material Description (Short Text)_MAKTX.
- Text: The SAP description is used as column name in the destination e.g., Material Description (Short Text).
Date conversion #
Convert date strings
Converts the character-type SAP date (YYYYMMDD, e.g., 19900101) to a special date format (YYYY-MM-DD, e.g., 1990-01-01). Target data uses a real date data-type and not the string data-type to store dates.
Convert invalid dates to
If an SAP date cannot be converted to a valid date format, the invalid date is converted to the entered value. NULL is supported as a value.
When converting the SAP date the two special cases 00000000 and 9999XXXX are checked at first.
Convert 00000000 to
Converts the SAP date 00000000 to the entered value.
Convert 9999XXXX to
Converts the SAP date 9999XXXX to the entered value.
SSRS in Visual Studio #
The following section contains step-by-step instructions on how to access SAP data in the SSRS environment via Xtract Universal.
Extracting SAP Data in Xtract Universal Designer #
To make SAP data available in the SSRS environment, the first step is to create an extraction in the Xtract Universal Designer.
For information on how to set up an extraction, see Getting Started.
Make sure the extraction uses the Power BI Report Server (SQL Server Reporting Services) destination.
Adding an Extraction as a Data Source in Visual Studio #
The following steps guide you through the creation of an Xtract Universal data source in Visual Studio:
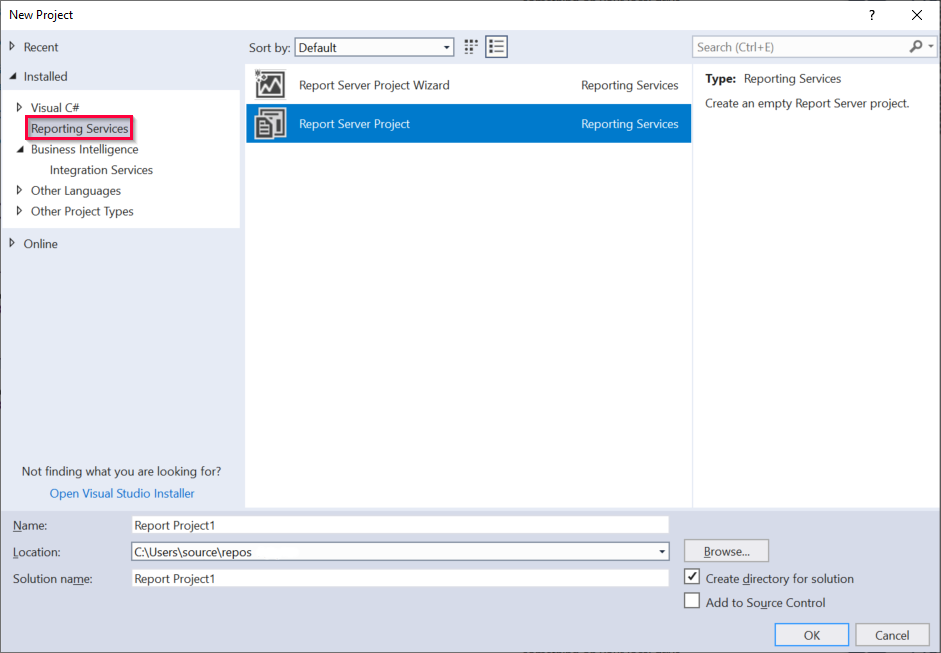
- Create a new “Report Server Project” in Visual Studio.
- Right-click the Shared Data Sources folder in the Solution Explorer and select Add New Data Source. The window “Shared Data Source Properties” opens.
- In the tab General, assign a name of your choice or leave the default one for the new data source (1).
- Select the type Xtract Universal from the drop-down list (2).
If Xtract Universal is not available or displayed in all caps, make sure that the latest Xtract Universal version and Microsoft Reporting Services Projects plugin are both installed. - Enter a connection string (3) to XU’s Web Server in the format
Url=http://[host]:[port]/e.g,Url=http://localhost:8065/. Note that the connection string is case sensitive.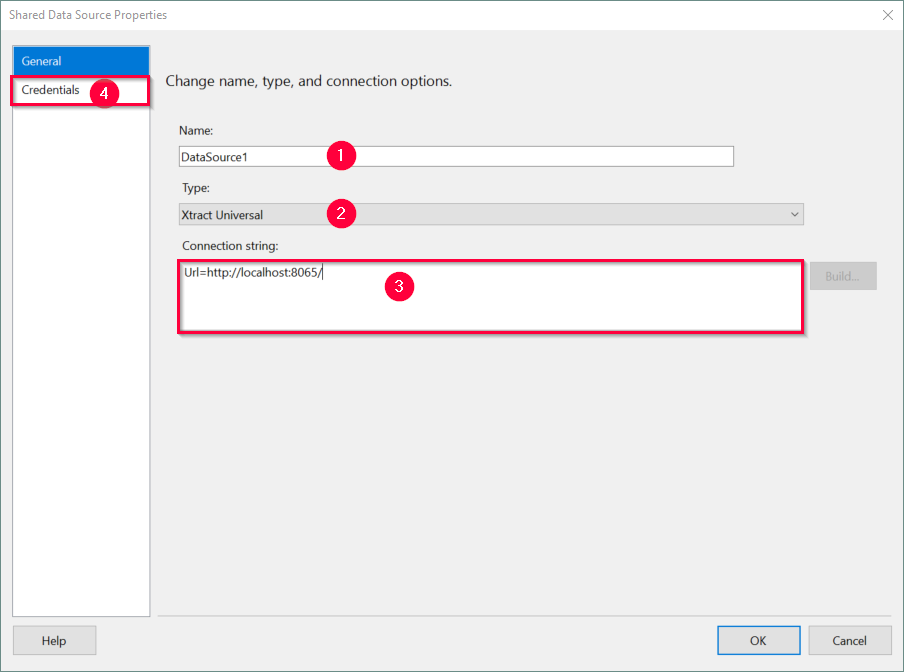
- Optional (only required if the XU Web server security is configured or the SAP source requires SAP credentials): Switch to the Credentials tab (4) and enter your username and password for Xtract Universal.
- Confirm your input with [OK].
If Xtract Universal is not available in the drop-down list (2) even though the Microsoft Reporting Services Projects plugin (version 2.6.11 or higher) and the latest version of Xtract Universal are both installed, send the log file located in C:\Program Files\XtractUniversal\ssrs\log.txt to Theobald Support.
Tip: The connection string is part of the URL string displayed in the “Run Extraction” window of the Designer. Copy the URL string up to ‘?’ and paste it as the connection string into Visual Studio.
Note: When https Restricted… or https Unrestricted is activated in the XU Webserer settings, make sure to modify the Registry of the machine that runs the SSRS server according to the Microsoft Help (Configure Strong cryptography).
Creating a Report using an Xtract Universal Data Source #
The following steps guide you through the creation of a Report in Visual Studio using an Xtract Universal data source:
- Add a Power BI Report Server extraction as a data source in Visual Studio.
- Right-click the Reports folder in the Solution Explorer and select Add New Report. The “Report Wizard” opens.
- In the wizard, select a data source and click [Next].
- Click [Query Builder…]. The window “Query Designer” opens.
- Select an Xtract Universal extraction from the drop-down menu (5).
If no extractions are available, make sure the connection string (3) in the data source is correct and an extraction with an SQL Server Reporting Server destination exists in Xtract Universal. If you don’t see the editor shown below, click Edit as Text.
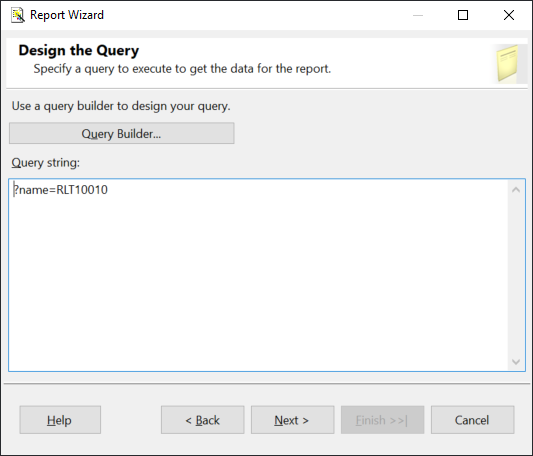
- Optional: Change runtime parameters of the extraction (6). Parameter changes are visible in the Query string (7). Invalid input is marked with a red circle that displays an error message when hovering over it.
- Click [Preview] (8) to run the extraction in preview mode.
- Confirm your input with [OK]. The Query Builder closes.
- Make sure the Query string from the Query Builder is displayed in the Report Wizard before clicking [Next].
- Complete the Report Wizard according to your preferences.
After creating the report, you can access the Query Builder by right-clicking the Dataset in Report Data and selecting Query….
Tip: Passing the (Windows) user that runs a report on the report server or in Visual Studio is supported. For this, you need to set up the web server authentication in Xtract Universal. Single Sign On in SAP is also supported, see Single Sign On.
Parameterization #
Xtract Universal Designer uses runtime parameters for parameterization.
Runtime parameters are accessible in the Query Builder. They can have one of the following Behaviors:
- Default: Uses the value specified in Xtract Universal Designer.
- Constant: Enter a constant value to be used during runtime.
- Parameterized: Enter the name of a dynamic query parameter to use as a runtime parameter. The value of that parameter can either come from an input field, from the user or from a computed parameter using a formula.
Note: Every runtime parameter with Parameterized Behaviour allows only one query parameter name as its input. If you want to use multiple inputs for a runtime parameter, you can use VS Report Designer tools to combine multiple parameters into a single Computed Query Parameter, see Using Computed Query Parameters for SSRS with Xtract Universal.
How to set dynamic Runtime Parameters
Use VS query parameters as input for Xtract runtime parameters.
- To create a new query parameter right-click the data set in the Report Data section and select Dataset Properties. The window “Dataset Properties” opens.
- Switch to the tab Parameters and press [Add].
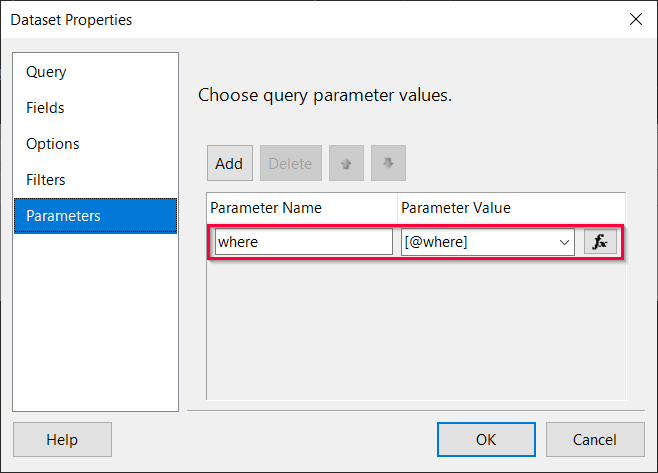
- Enter a Parameter Name (1) and a Parameter Value or use the [f(x)] button to use formulas and/or combine multiple input values.
- Switch to the Query tab and press [Query Designer…]. The window “Query Designer” opens.
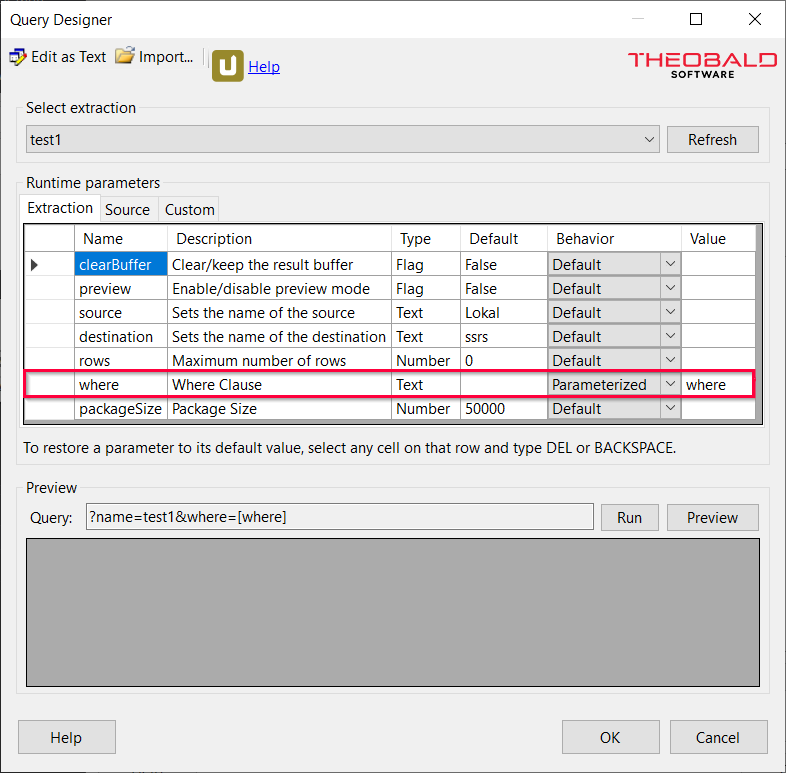
- Select Parameterized as the Behaviour of the runtime parameter you want to dynamize.
- Enter the name of the new query parameter (1) under Value.
- Confirm your input with [OK].
How to make Parameters optional
If a query parameter is NULL, that parameter is not passed at runtime and thus will be ignored.
Note: Depending on the extraction type some runtime parameters cannot be ignored e.g., most custom parameters are mandatory.
- Right-click the input field of the parameter you want to be optional and select Parameter Properties. The window “Report Parameter Properties” opens.
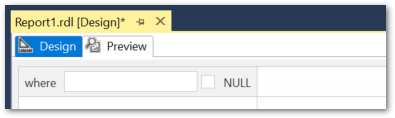
- In the General tab, activate the checkbox Allow null value.
- Confirm your input with [OK]. A checkbox NULL appears next to the input field.
- If the checkbox NULL is activated, the parameter will be ignored at runtime.
Tip: You can also use a computed query parameter to create a value of NULL. Create a formula that returns Nothing as the value.