Introduction #
This section contains information on connecting Power BI and Xtract Universal via the Power BI Connector target environment of Xtract Universal.
The target environment Power BI Connector offers two ways to connect Power BI with Xtract Universal:
- Power BI custom connector
- Generic Power Query M-script
Supported Power BI environments #
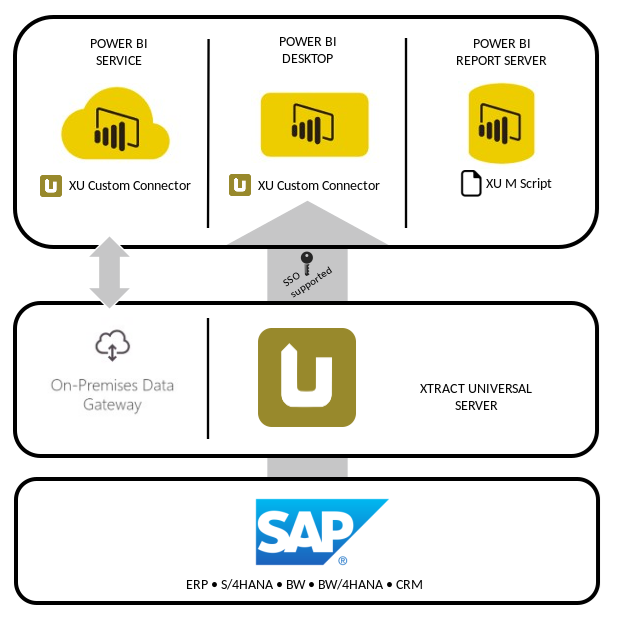
Xtract Universal supports the following environments:
- Power BI Desktop via Power BI Custom Connector
- Power BI service via Power BI on-premises data gateway
- Power BI Report Server via Power Query M-script
| Custom Connector | M-script | |
|---|---|---|
| Power BI Desktop | X | X |
| Power BI service | X | X |
| Power BI Report Server | - | X |
Connection #
Adding a Destination #
- In the main window of the Designer, navigate to Server > Manage Destinations. The window “Manage Destinations” opens.
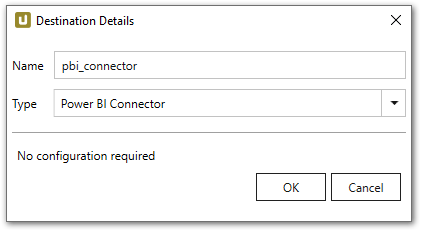
- Click [Add] to create a new destination. The window “Destination Details” opens.
- Enter a Name for the destination.
- Select the destination Type from the drop-down menu.
Destination Details #
To use the Power BI Connector destination, no further settings have to be made.
 The extractions are now visible in the Power BI Custom Connector.
Settings #
Opening the Destination Settings #
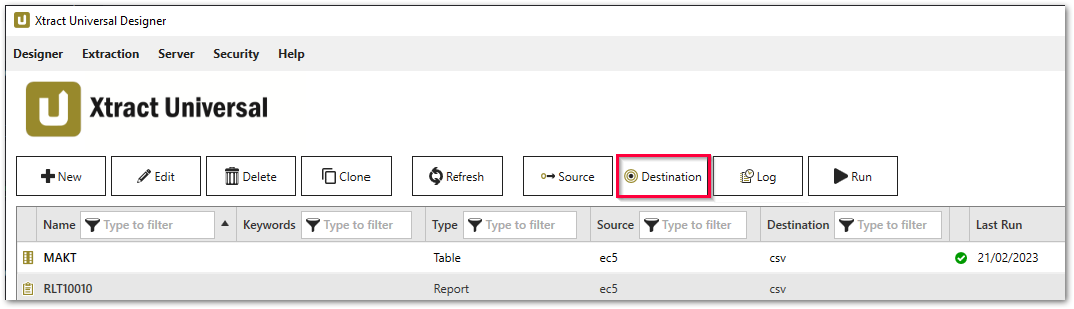
- Create or select an existing extraction, see Getting Started with Xtract Universal.
- Click [Destination]. The window “Destination Settings” opens.
The following settings can be defined for the destination:
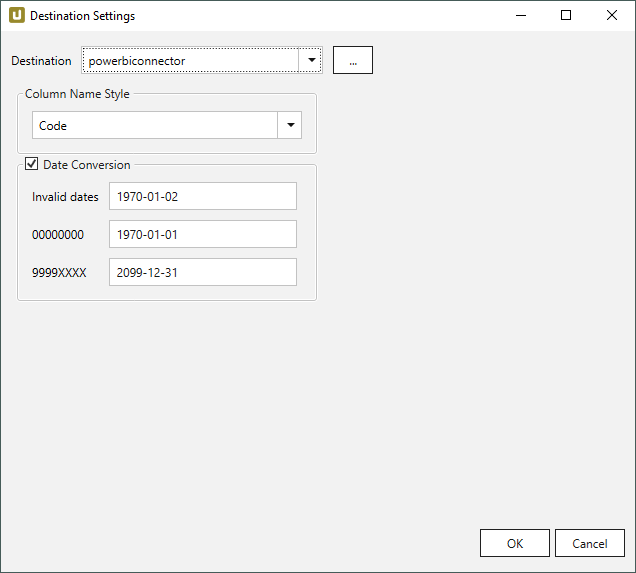
Column Name Style #
Defines the style of the column name. Following options are available:
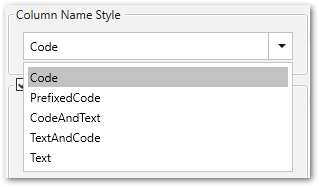
- Code: The SAP technical column name is used as column name in the destination e.g., MAKTX.
- PrefixedCode: The SAP technical column name is prefixed by SAP object name and the tilde character e.g., MAKT~MAKTX
- CodeAndText: The SAP technical column name and the SAP description separated by an underscore are used as column name in the destination e.g., MAKTX_Material Description (Short Text).
- TextAndCode: The SAP description and the SAP technical column name description separated by an underscore are used as column name in the destination e.g., Material Description (Short Text)_MAKTX.
- Text: The SAP description is used as column name in the destination e.g., Material Description (Short Text).
Date conversion #
Convert date strings
Converts the character-type SAP date (YYYYMMDD, e.g., 19900101) to a special date format (YYYY-MM-DD, e.g., 1990-01-01). Target data uses a real date data-type and not the string data-type to store dates.
Convert invalid dates to
If an SAP date cannot be converted to a valid date format, the invalid date is converted to the entered value. NULL is supported as a value.
When converting the SAP date the two special cases 00000000 and 9999XXXX are checked at first.
Convert 00000000 to
Converts the SAP date 00000000 to the entered value.
Convert 9999XXXX to
Converts the SAP date 9999XXXX to the entered value.
Power BI Custom Connector #
The Power BI Connector destination in Xtract Universal works in combination with a custom extension file for Power BI. This file is named XtractUniversalExtension.pqx. This file can be found in the powerbi folder inside the installation directory of Xtract Universal.
The Power BI Custom Connector was developed following Microsoft’s guidelines for custom connectors in Power BI.
For installing the Power BI Custom Connector follow the steps under Manul Setup or Automatic Setup.
Manual Setup #
When using Power BI Desktop:
- Check if the directory
[Documents]\Power BI Desktop\Custom Connectorsexists. - Create this directory if it doesn’t exist.
- Open the powerbi folder located in the Xtract Univesal installation directory, e.g.,
C:\Program Files\XtractUniversal\powerbi\. - Copy the XtractUniversalExtension.pqx file from the powerbi folder to
[Documents]\Power BI Desktop\Custom Connectors. - Restart Power BI.
- In Power BI Desktop, navigate to File > Options and settings > Options > Security.
- Under Data Extensions, select the option (Not Recommended) Allow any extension to load without validation or warning.
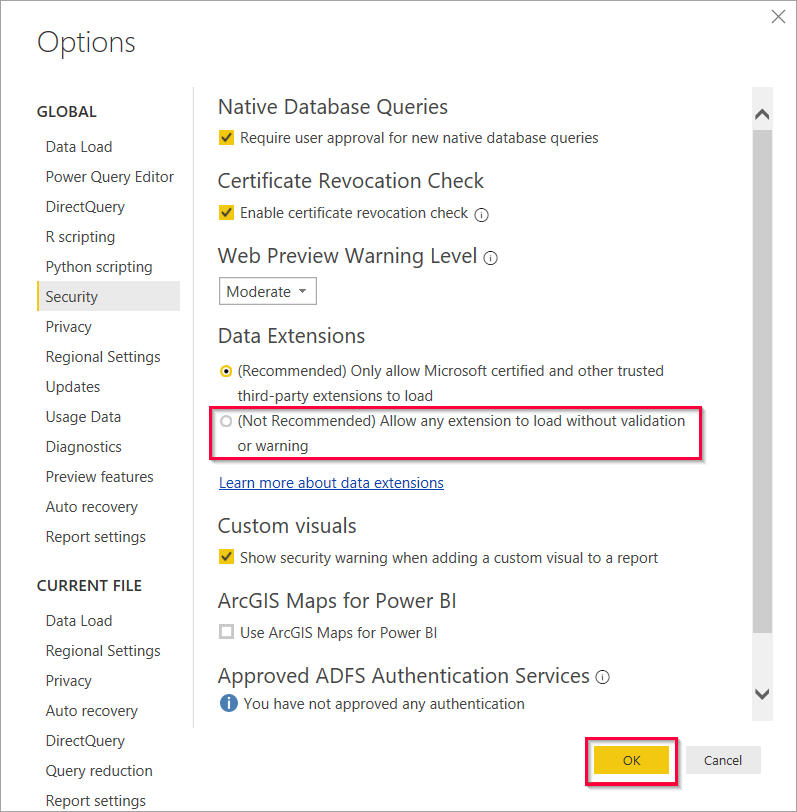
- Click [OK].
- Restart Power BI Desktop.
The Xtract Universal datasource is now available within Power BI.
Automatic Setup #
- Open the powerbi folder located in the Xtract Univesal installation directory.
- Run the install-connector PowerShell script.
This script copies the XtractUniversalExtension.pqx file to the[Documents]\Power BI Desktop\Custom Connectorsfolder. The script creates the folder first if it doesn’t exist. - Run the trust-connector PowerShell script.
This script modifies the registry atHKLM:\SOFTWARE\Policies\Microsoft\Power BI Desktop\. The script adds or modifies the registry value TrustedCertificateThumbprints with the thumbprint of the XtractUniversalExtension.pqx file. This procedure follows Microsoft’s recommendations for trusting third-party connectors.
Connecting Power BI with Xtract Universal #
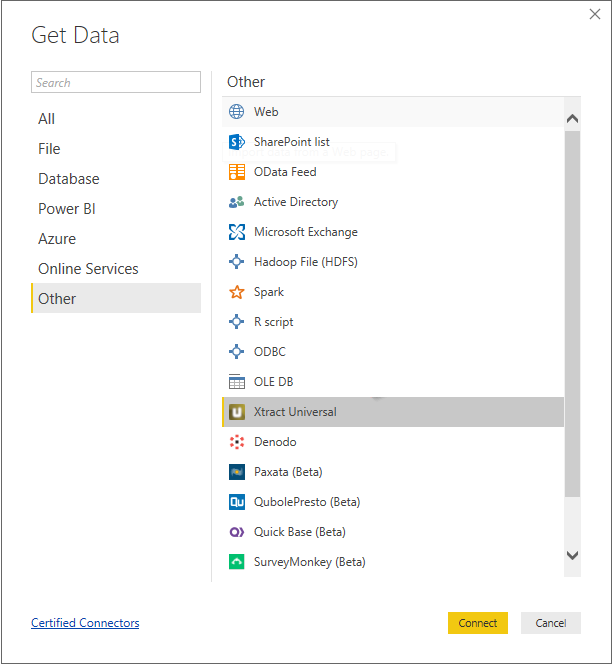
- Select Xtract Universal from the Get Data menu
- Click on the Connect button.
-
Enter the URL of the Xtract Universal web server
<Protocol>://<HOST or IP address>:<Port>/.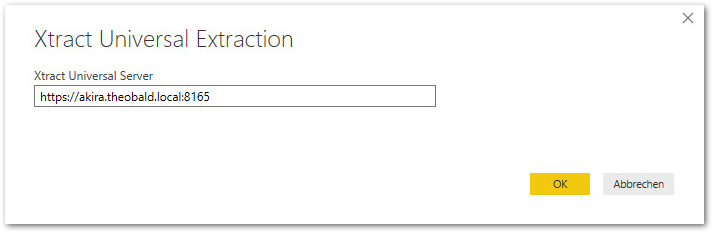
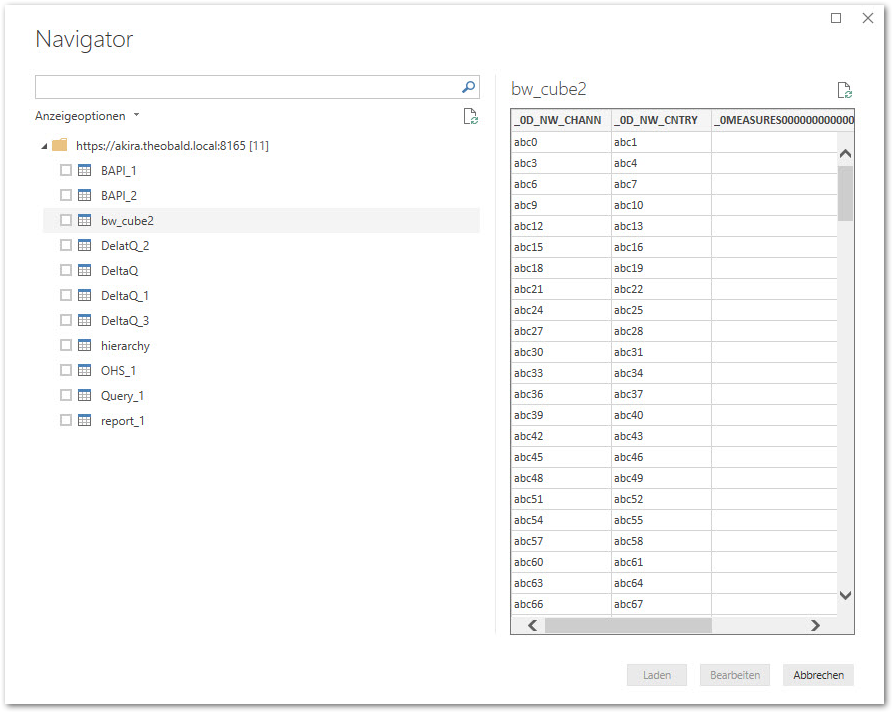
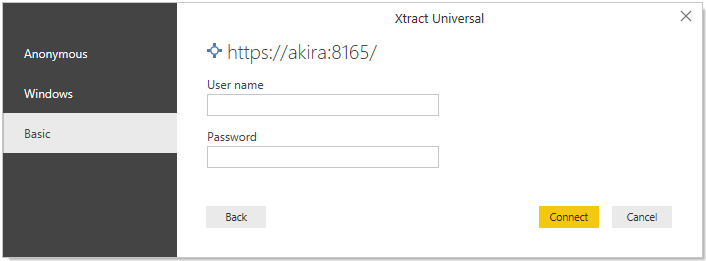
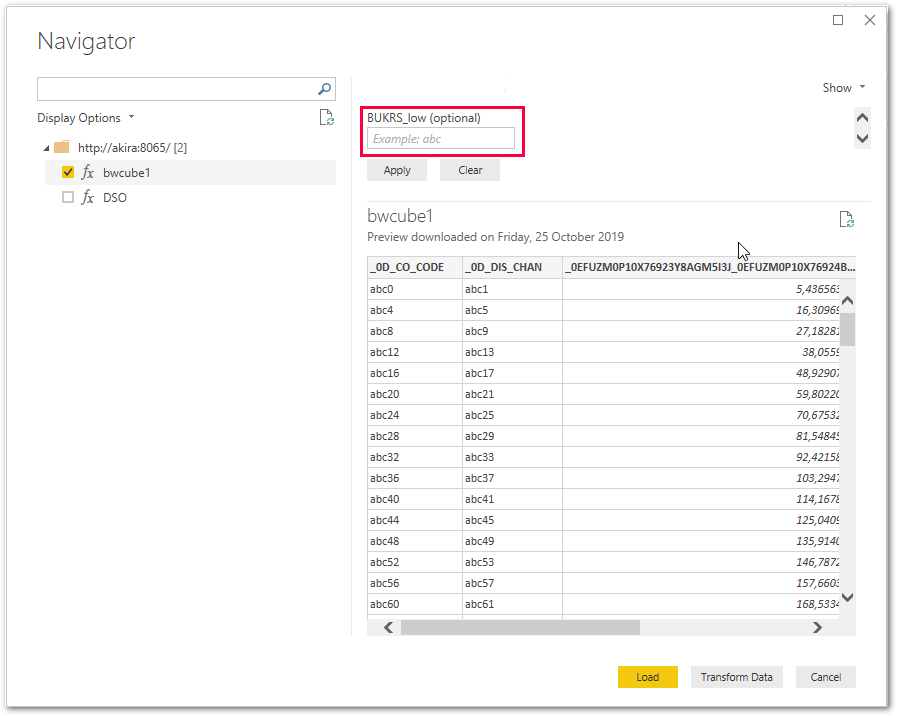
When prompted for Anonymous, Basic or Windows authentication, follow the steps as outlined in Single Sign On and SAP authentication The Navigator window lists all extractions that are set to Power BI Connector destination in Xtract Universal.
- Select an extraction from the list. The preview data shows the actual SAP column headers and preview data (real data or dummy data, depending on the extraction type).
- Click the Load button. This triggers an extraction in Xtract Universal and writes the extracted data to Power BI.
Power Query M-script #
Instead of the Power BI Custom Connector, you can also use the Custom Power Query M-script to connect Power BI to Xtract Universal.
The Power BI Query M-script is located inside the Xtract Universal installation directory: C:\Program Files\XtractUniversal\powerbi\loading_script.txt.
Warning! Use of the Custom Connector & Query M-script
Power Query M-script and Power BI Custom Connector do not belong together.
Use either the Power Query M-script or the Power BI Custom Connector.
Set up the Power Query M-script in Power BI #
Note: Only use the extractions with the Power BI Connector destination.
- Create a new Power BI report using Home > Get Data > Blank Query as data source.
- Open the [Advanced Editor].

- Open the Xtract Universal loading_script in any text editor.
- Copy the complete content into the Advanced Editor window in Power BI.
- Change the values for ExtractionName and the ServerURL to match the names of your Xtract Universal extraction and web server (1).
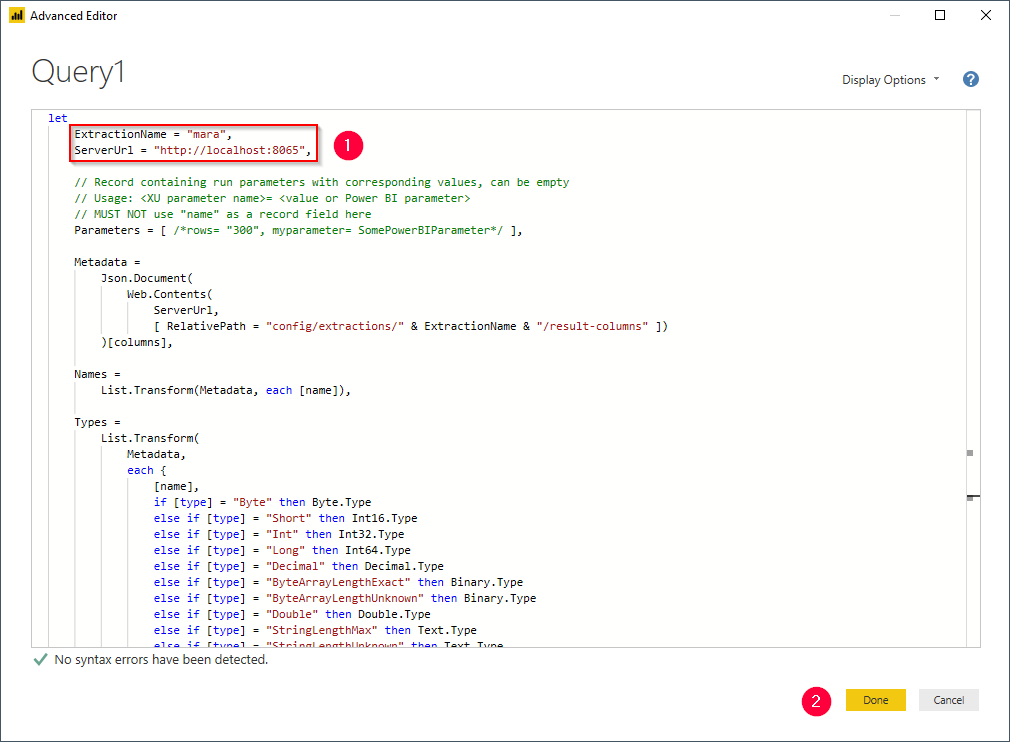
- Confirm the script by clicking [Done] (2) within Advanced Editor.}
- Click on {Close & Apply].
- When prompted for Anonymous, Basic or Windows authentication, follow the steps as outlined in Single Sign On and SAP authentication
Power BI Service #
Prerequisites #
The connection of the Power BI Service requires the following components:
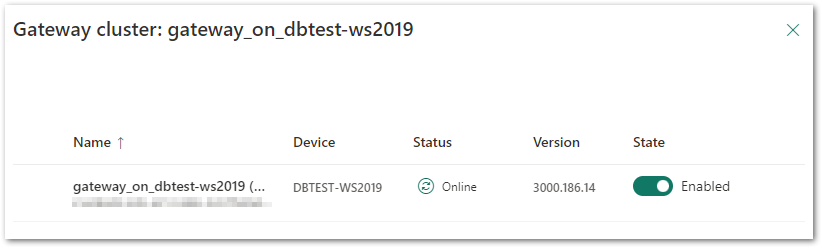
Setup on-premisess Data Gateway #
To set up the on-premisess Data Gateway using the Power BI Custom Connector, follow the steps below.
Note: The connection to Xtract Universal can be created using Power Query M-script or Power BI Custom Connector. Using Power Query M-script does not require further configuration.
- Install the on-premisess Data Gateway on the Xtract Universal application server.
- Configure the Data Gateway, see Use the on-premises data gateway app.
- Switch to the Connectors tab and define the path to the Power BI Custom Connector e.g., in
*[Documents]\Power BI Desktop\Custom Connectors*.
The XtractUniversalExtension will then be displayed as a Custom Data Connector.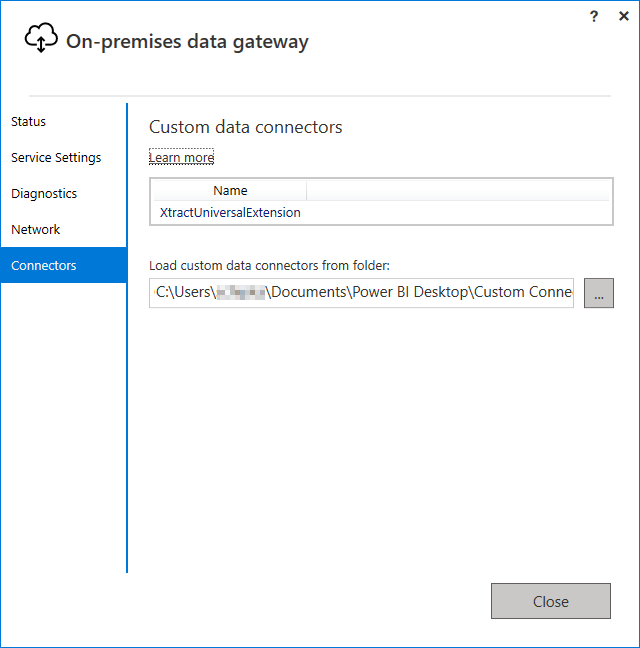
Add Xtract Universal as a Data Source #
Note: Make sure that enabling and usage of custom connectors in Power BI are activated.
If the Xtract Universal entry is not available in the drop-down menu, check the configuration in the Setup On-Premisess Data Gateway section.
The configured on-premises data gateway is then integrated into the Power BI service environment. A DataSource to the Xtract Universal Server must then be set up.
- In the Power BI service, navigate to Settings > Manage connections and gateways and click [+ New]. The New Connection window opens.
- Select the connection type On-premises (default setting). Fill in the necessary fields:
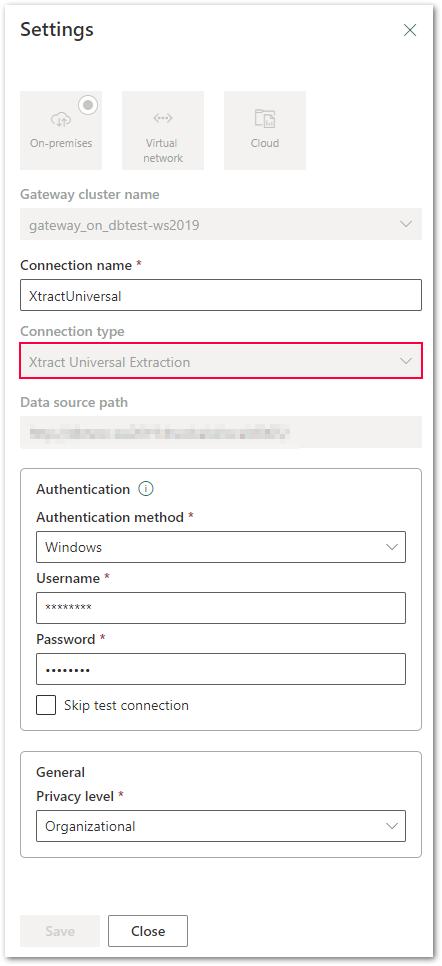
- Select the previously created “Data Gateway” from the Gateway cluster name drop-down menu.
- Assign a name to the connection under Connection name.
- Select “Xtract Universal Extraction” under Connection type. If the Xtract Universal entry is not available in the drop-down menu, check the configuration in the Setup On-Premisess Data Gateway section.
- Specify the Xract Universal Server URL under Server, see Web Server.
- Decide on the appropriate authentication method under Authentication Method, see Single Sign On and SAP Authentication:
Decide on a suitable option:- Basic
- Windows
- Anonymous
- Click [Create], a connection is created and an automatic connection test is performed.
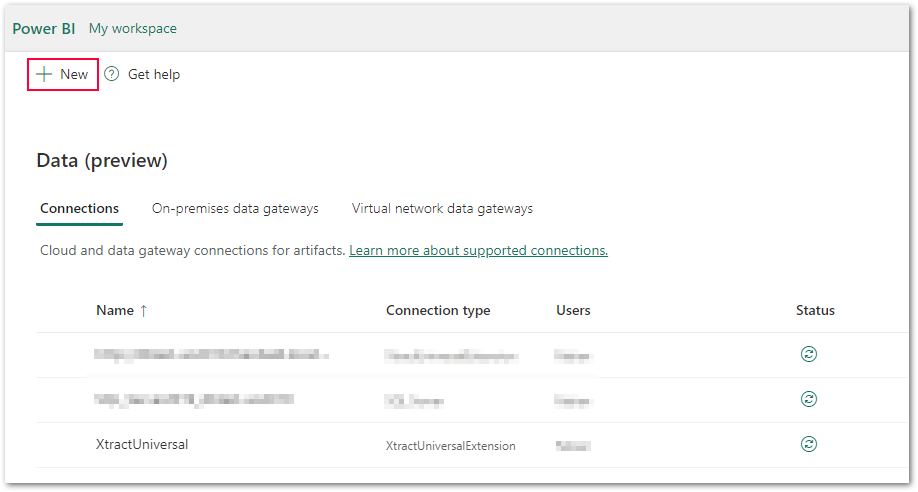
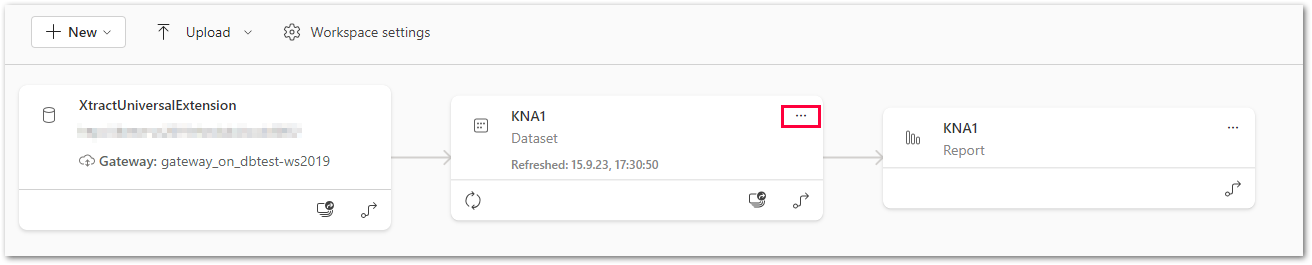
Data Source Status #
-
Check the Data Source Status and other settings, e.g., Schedules Refresh.
-
Under [Workspace settings] navigate to the settings of the dataset […].
-
Expand the entry Gateway and cloud connections.
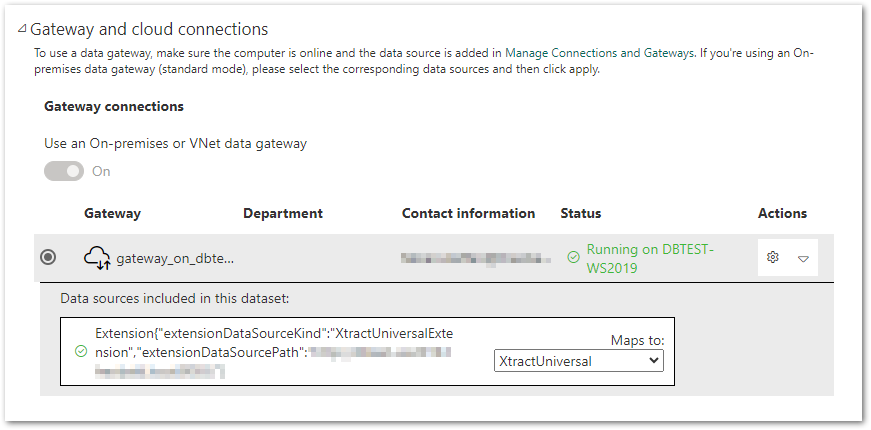
- Configure the connection of the uploaded Power BI dataset.
- Select the defined gateway and select the name of the connection (here XtractUniversal) from the drop-down menu under the option Extention.
The status of the connection is checked and reported back in the Status field.
Single Sign On and SAP authentication #
When setting up the Xtract Universal data source in Power BI for the first time, you are prompted for one of the following auhtorization methods. Select an auhtorization method according to your landscape:
- Anonymous: Select this option if the Xtract Universal server settings don’t require any authentication for running an extraction.
- Basic: Select this option if the Require SAP Credentials to be explicitly supplied for execution checkbox is marked in the SAP Source Settings in Xtract Universal. Enter your SAP credentials in the respective input fields.
- Windows: Select this option if you want to use SSO or if you have restricted access to extractions in the Xtract Universal server settings. Enter <domain>\<Windows AD user> in the user field and your Windows password in the Password field.
Xtract Universal and the Power BI Connector destination support single sign on (SSO) to SAP. If SSO is set up correctly, the Windows credentials of the executing Power BI user are mapped to this user’s SAP credentials. This leverages the user’s SAP authorizations and Power BI will only show data that matches the user’s SAP authorizations.
Parameterizing #
The Power BI Custom Connector exposes Xtract Universal custom parameters in Power BI Desktop. Using the Power BI Custom Connector Xtract Universal custom parameters can be populated with values when running an extraction from Power BI Desktop.
Power BI Custom Connector #
When using the Power BI Custom Connector, XU custom parameters can be populated when setting up the connection in Power BI.
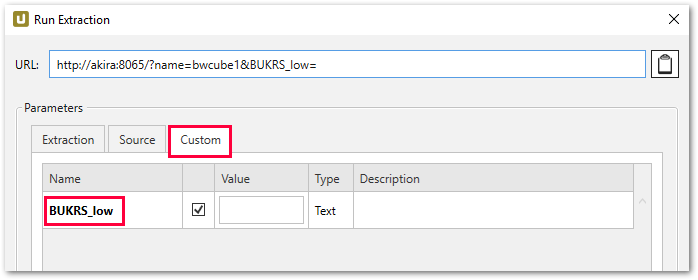
You created an extraction containing XU custom parameters. The list of custom parameters of the selected extraction is displayed under the Custom tab in the Run Extraction window.
In the depicted example the list contains one entry BUKRS_low.
The list of XU custom parameters is exposed in Power BI Desktop when creating a report based on the selected extraction. The exposed XU parameters can be filled with values from within Power BI Desktop.
Power Query M-script #
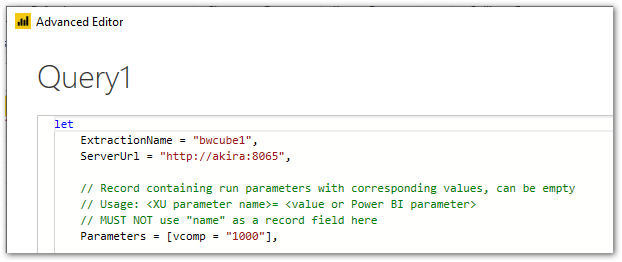
- Open the Power Query M-script.
- Navigate to “Parameters” and replace the values with actual values or with parameters defined in Power BI.
    // Record containing run parameters with corresponding values, can be empty
    // Usage: <XU parameter name>= <value or Power BI parameter>
    // MUST NOT use "name" as a record field here
    Parameters = [ /*rows= "300", myparameter= SomePowerBIParameter*/ ],
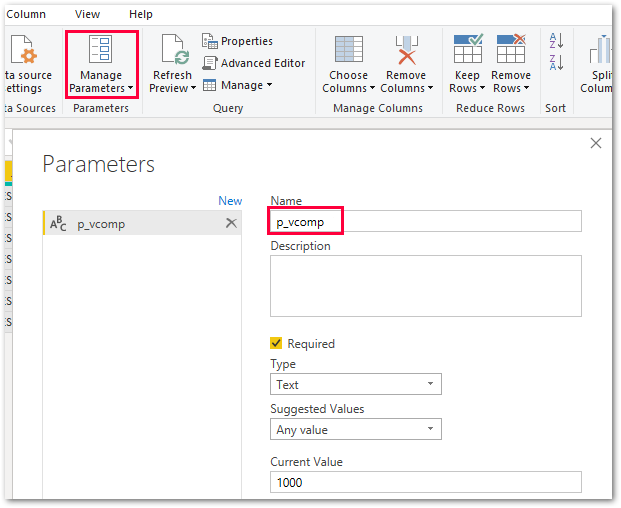
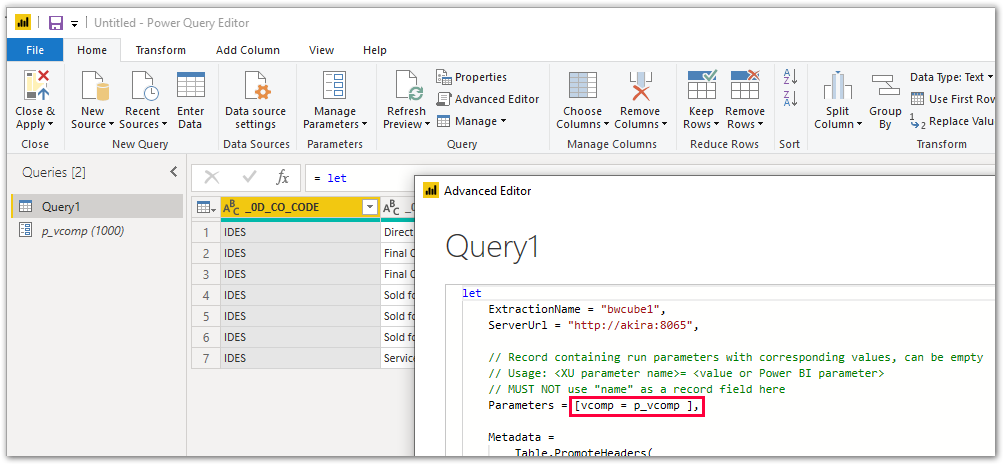
Replacement with actual values:
Replacement with Power BI parameters:
Power BI Options and Settings #
Set the following settings in Power BI:
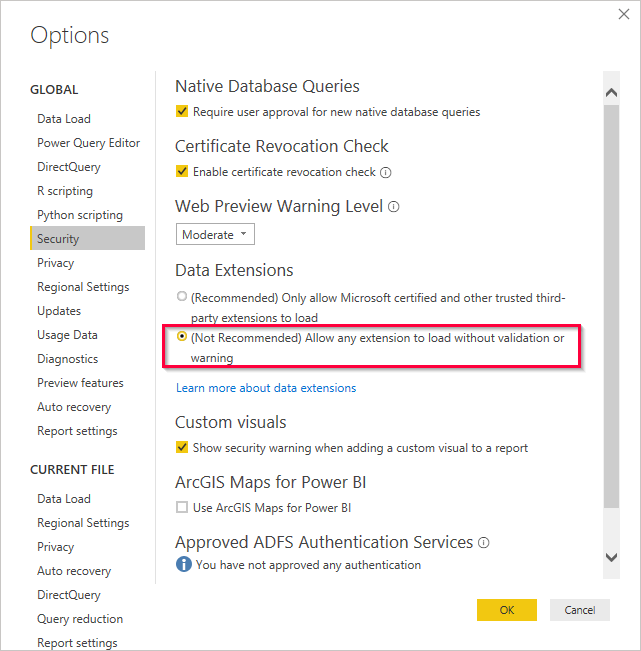
- Navigate to File > Options and settings > Options to open the option menu.
- Check the box (Not Recommended) Allow any extension to load without validation or warning in the tab Security.
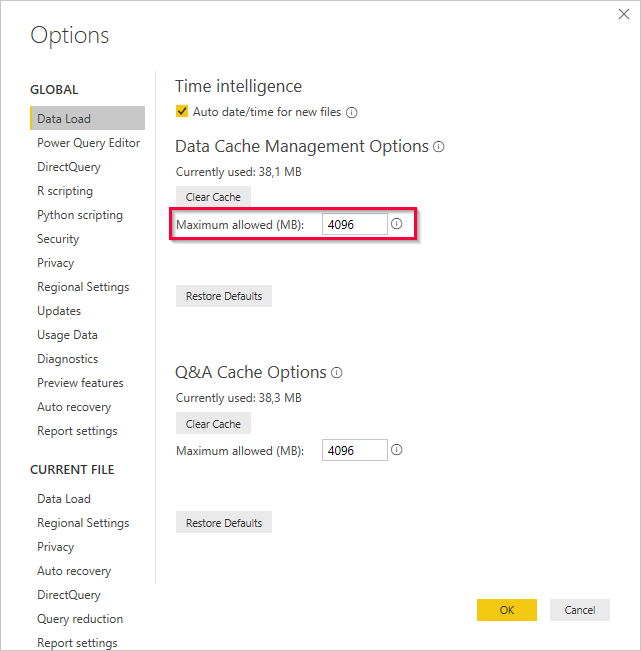
- Optional: Increase the Power BI cache in the tab Load Data to prevent multiple calls from Power BI to Xtract Universal when extracting large data volumes.
Multiple calls to Xtract Universal result in in multiple entries for the same extraction in the Xtract Universal extraction log.