The following section describes the loading of SAP data to a cloud based Azure Storage.
Requirements #
The Azure Storage (Blob / Data Lake) destination supports the following Azure storage account types:
- General-purpose V2 (including Azure Data Lake Storage Gen2)
- General-purpose V1
- BlockBlobStorage
- BlobStorage
To use the Azure Storage (Blob / Data Lake) destination you need one of the above Azure storage accounts. For further information refer to the official Microsoft Azure storage documentation.
Connection #
Adding a Destination #
- In the main window of the Designer, navigate to Server > Manage Destinations. The window “Manage Destinations” opens.
- Click [Add] to create a new destination. The window “Destination Details” opens.
- Enter a Name for the destination.
- Select the destination Type from the drop-down menu.
Destination Details #
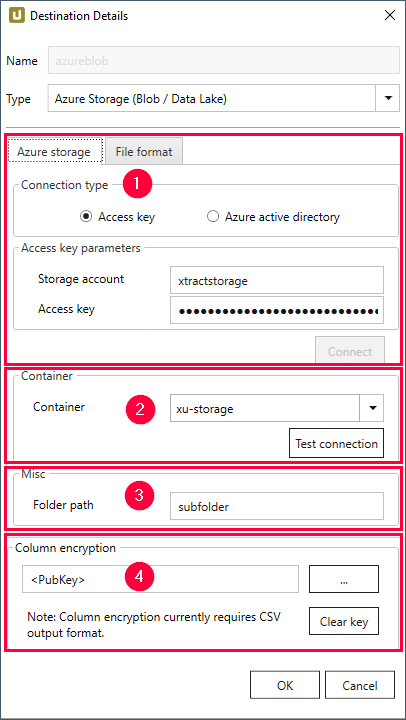
Connection Type (1) #
The subsection Connection Type offers two different methods for authenticating and authorizing access to an Azure Storage account:
- Authentication via Access Key
- Authentication via Azure Active Directory
1. Authentication via Access Key
This method of authentication authorizes access to the complete storage account.
General information about this method of authentication can be found in the Microsoft documentation.
Check the Access key checkbox to select this connection type.
Connection via Access Key
Storage account
Enter your storage account name. Do not enter the full URL.
Access key
Enter the access key of the Azure Storage account.
Tip: Copy your storage account name and access key from the Azure Portal.

Connect
Click [Connect] to establish a connection to the storage account.
If the connection is successful, a “Connection successful” info window opens.
Click [OK] to confirm.
2. Authentication via Azure Active Directory
Authentication via Azure Active Directory uses OAuth 2.0 and Azure AD for authentication. Compared to Authentication via Access Key, this option allows a more granular way of authorizing access to a storage account and its individual storage containers. General information about this method of authentication can be found in the Microsoft documentation.
Prerequisites
Note: Authentication via Azure Active Directory requires an Azure AD tenant. How to set up an Azure AD tenant is described in the Microsoft documentation.
Before using authentication via Azure Active Directory, perform the following steps in the Azure Portal:
- In the Azure Portal, open the Azure Active Directory service.
- Register an app with your Azure AD tenant. To do this, follow the steps as described in the Microsoft documentation. Register the app as Public client/native (mobile & desktop).
- Add API permissions to the registered app to grant access to the Azure Storage web API. The following permissions are required:
Azure Storage - Delegated permissions - user impersonation,
Microsoft Graph - User.Read.
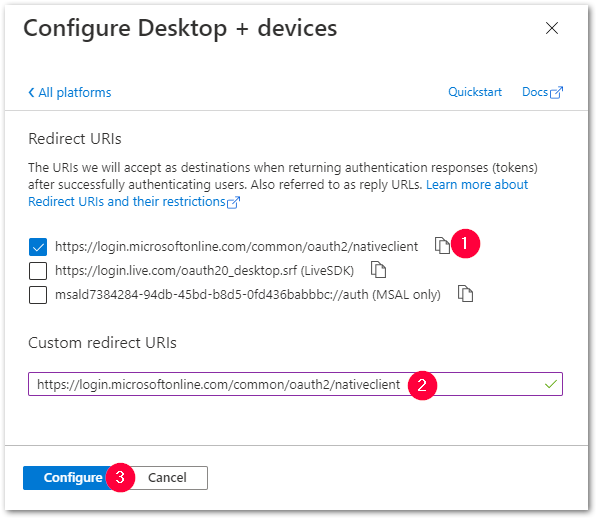
Follow the steps described in the Microsoft documentation. - Assign https://login.microsoftonline.com/common/oauth2/nativeclient as the standard Redirect URI (1).
This can be done in the Azure AD app registration via Manage > Authentication > Add a platform > Mobile and desktop applications.
Copy and paste the URL into in the Custom redirect URI field (2) and click [Configure] (3).
In the Authentication screen confirm with [Save].
- In the Azure Portal, open your Azure Storage account.
- Assign access rights to the Azure Storage as described in the Microsoft documentation.
The required RBAC role is Storage Blob Data Contributor.
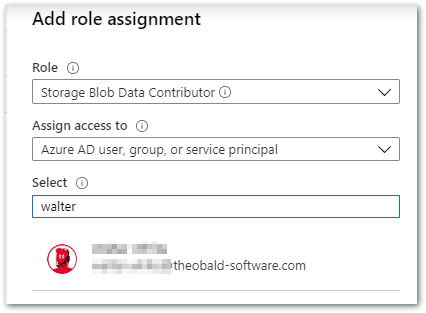
Tip: Access rights can be granted on storage account or container level.
Connection via Azure Active Directory
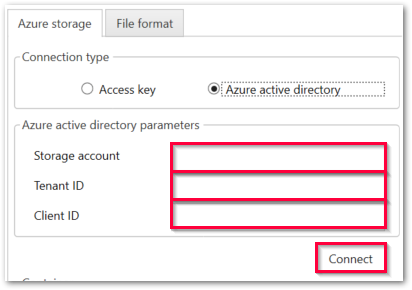
Storage account
Enter your storage account name.
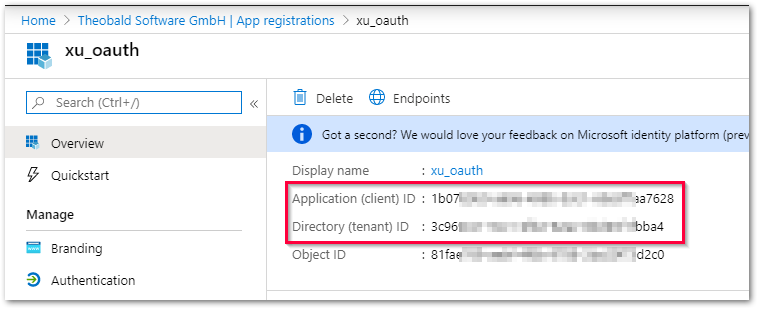
Tenant ID
Enter the ID of the Azure AD tenant.
Client ID
Enter the ID of the registered app.
Tip: Copy tenant ID and client ID from the Azure portal.
Connect
To establish a connection to the Azure Storage account:
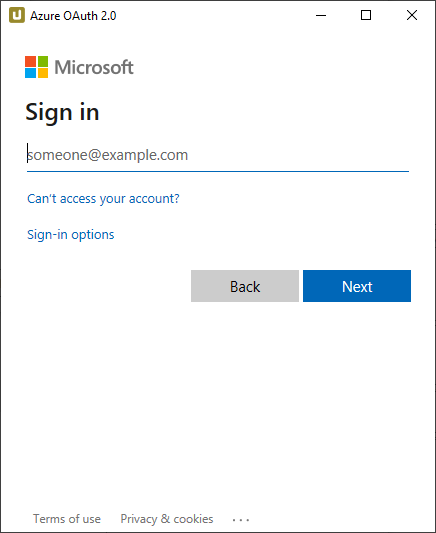
- Click [Connect]. A browser window pops up.
- Sign in using your Azure AD credentials.
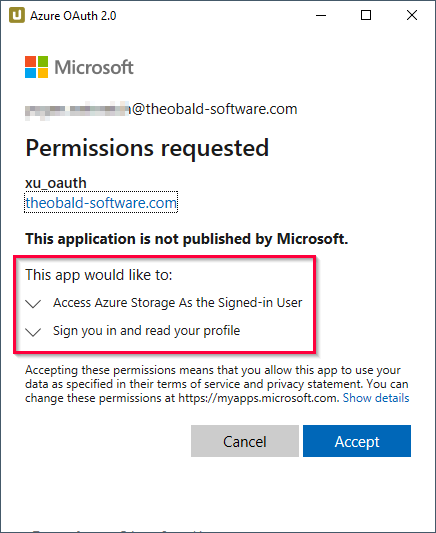
- The “Permissions requested” window lists the requested permissions (see Prerequisites above). Click [Accept].
- If the connection is successful, a “Connection successful” info window opens.
Click [OK] to confirm.
Container (2) #
This subsection is activated after a connection to the storage account was successfully established.
Container
When using Access Key authentication, choose a Blob container from the drop-down menu. When using Azure Active Directory authentication, enter the name of the Blob container manually.
Test connection
Click [Test Connection] to check if the storage container can be accessed.
If the connection is successful, a “Connection to container <name of container> successful” info window opens.
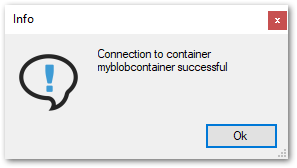
Click [OK] to confirm.
The Azure Storage (Blob / Data Lake) destination can now be used.
Misc (3) #
Note: The settings in Misc can only be used in combination with a Blob container.
Folder path
Option to create a folder structure within the container for saving files, see also Destination Settings > Folder Path..
For creating a single folder, enter a folder name without slashes: [folder]
Subfolders are supported and can be defined using the following syntax: [folder]/[subfolder_1]/[subfolder_2]/[..]
Using Script Expressions as Dynamic Folder Paths
Script expressions can be used to generate a dynamic folder path. This allows generating folder paths that are composed of an extraction’s properties, e.g., extraction name, SAP source object. The described scenario supports script expressions based on .NET and the following XU-specific custom script expressions:
| Input | Description |
|---|---|
#{Source.Name}# |
Name of the extraction’s SAP source. |
#{Extraction.ExtractionName}# |
Name of the extraction. If the extraction is part of an extraction group, enter the name of the extraction group before the name of the extraction. Separate groups with a ‘,’, e.g, Tables,KNA1, S4HANA,Tables,KNA1. |
#{Extraction.Type}# |
Extraction type (Table, ODP, BAPI, etc.). |
#{Extraction.SapObjectName}# |
Name of the SAP object the extraction is extracting data from. |
#{Extraction.Timestamp}# |
Timestamp of the extraction. |
#{Extraction.SapObjectName.TrimStart("/".ToCharArray())}# |
Removes the first slash ‘/’ of an SAP object. Example: /BIO/TMATERIAL to BIO/TMATERIAL - prevents creating an empty folder in a file path. |
#{Extraction.SapObjectName.Replace('/', '_')}# |
Replaces all slashes ‘/’ of an SAP object. Example: /BIO/TMATERIAL to _BIO_TMATERIAL - prevents splitting the SAP object name by folders in a file path. |
#{Extraction.Context}# |
Only for ODP extractions: returns the context of the ODP object (SAPI, ABAP_CDS, etc). |
#{Extraction.Fields["[NameSelectionFields]"].Selections[0].Value}# |
Only for ODP extractions: returns the input value of a defined selection / filter. |
#{Odp.UpdateMode}# |
Only for ODP extractions: returns the update mode (Delta, Full, Repeat) of the extraction. |
#{TableExtraction.WhereClause}# |
Only for Table extractions: returns the WHERE clause of the extraction. |
#{Extraction.Fields["[0D_NW_CODE]"].Selections[0].Value}# |
Only for BWCube extractions (MDX mode): returns the input value of a defined selection. |
#{Extraction.Fields["[0D_NW_CHANN]"].RangeSelections[0].LowerValue}# |
Only for BWCube extractions (MDX mode): returns the lower input value of a defined selection range. |
#{Extraction.Fields["[0D_NW_CHANN]"].RangeSelections[0].UpperValue}# |
Only for BWCube extractions (MDX mode): returns the upper input value of a defined selection range. |
#{Extraction.Fields["0D_NW_CODE"].Selections[0].Value}# |
Only for BWCube extractions (BICS mode): returns the input value of a defined selection. |
#{Extraction.Fields["0D_NW_CHANN"].RangeSelections[0].LowerValue}# |
Only for BWCube extractions (BICS mode): returns the lower input value of a defined selection range. |
#{Extraction.Fields["0D_NW_CHANN"].RangeSelections[0].UpperValue}# |
Only for BWCube extractions (BICS mode): returns the upper input value of a defined selection range. |
Column Encryption (4) #
The “Column Encryption” feature enables users to encrypt columns in the extracted data set before uploading them to the destination. By encrypting the columns you can ensure the safety of sensitive information. You can store data in its encrypted form or decrypt it right away.
The feature also supports random access, meaning that the data is decryptable at any starting point. Because random access has a significant overhead, it is not recommended to use column encryption for encrypting the whole data set.
How to proceed
Note: The user must provide an RSA public key.
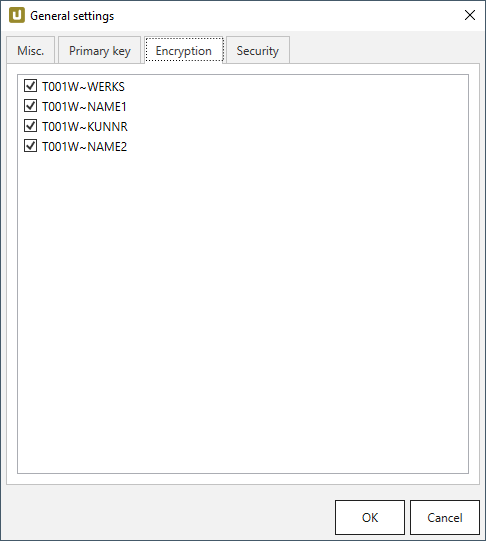
-
Select the columns to encrypt under Extraction settings > General settings > Encryption.
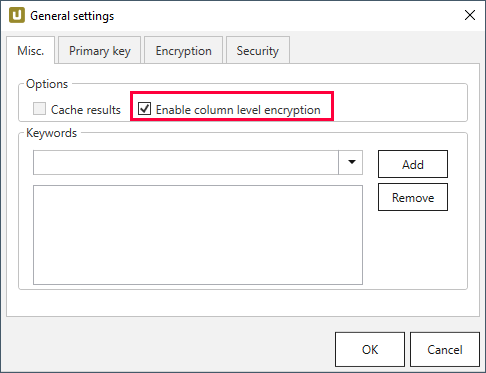
-
Make sure the Enable column level encryption checkbox is activated under Extraction settings > General settings > Misc..
-
Click […] in Destination Details > Column Encryption to import the public key as an .xml file.
-
Run the extraction.
-
Wait for XtractUniversal to upload the encrypted data and the “metadata.json” file to the destination.
-
Manually or automatically trigger your decryption routine.
Decryption
The decryption depends on the destination environment. Implementation samples for Azure Storage, AWS S3 and local flat file CSV environments are provided at GitHub. Included are the cryptographic aspect, which is open source and also the interface to read the CSV data and “metadata.json” which is not open source.
Technical Information
The encryption is implemented as a hybrid cryptosystem.
This means that a randomized AES session key is created when starting the extraction.
The data is then encrypted via the AES-GCM algorithm with the session key.
The implementation uses the recommended length of 96 bits for the IV.
To guarantee random access, each cell gets its own IV/nonce and Message Authentication Code (MAC).
The MAC is the authenticity token in GCM providing a signature for the data.
In the resulting encrypted data set, the encrypted cells are assembled like this:
IV|ciphertext|MAC
The IV is encoded as 7-Bit integer. The session key is then encrypted with the RSA public key provided by the user. This encrypted session key is uploaded to the destination as a “metadata.json” file, including a list of the encrypted columns and formatting information of the destination.
File Format #
File type
Select the required file format. You can choose between Parquet and CSV.
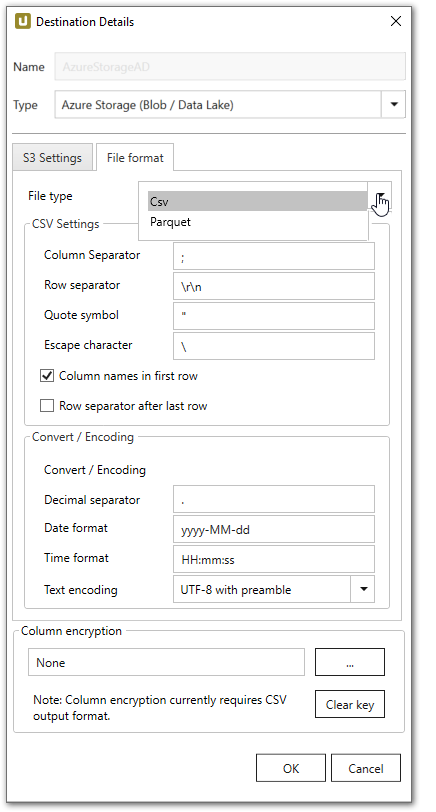
CVS Settings
The settings for file type CSV correspond to the Flat File CSV settings.
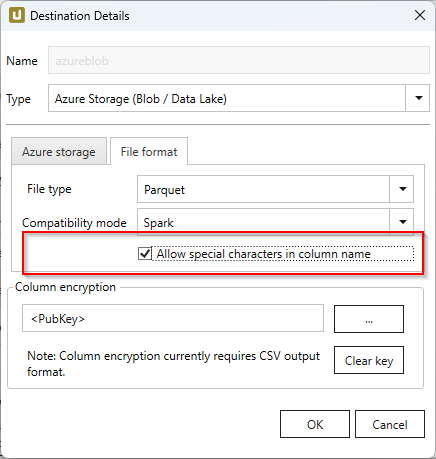
Parquet Settings
The following compatibility modes are available:
- Pure
- Spark
- BigQuery
Spark does not support the data types used in pure mode, so other data types need to be used. Special characters (e.g. ~) can be used in column names, when the option Allow special characters in column name is activated.
| SAP | Pure / BigQuery | Spark |
|---|---|---|
| INT1 | UINT_8 | INT16 |
| TIMS | TIME_MILLIS | UTF8 |
Connection Retry and Rollback #
Connection retry and rollback are built-in functions of the Azure Storage destination. They are activated by default.
Connection retry is a functionality that prevents extractions from failing if the connection to Azure is interrupted. The retry function is implemented according to Microsoft Guidelines. The retry logic is based on WebExceptionStatus.
If an exception is thrown, Xtract Universal uses an exponential retry strategy to reestablish connection to Azure. The selected exponential retry strategy results in 7 retry attempts and an overall timespan of 140 seconds. If a connection is not established during this timespan, the extraction fails.
Rollback covers scenarios where extractions do not fail due to connection failures to Azure but e.g. due to an error when connecting to SAP. In those cases Xtract Universal tries to remove any files from Azure storage that were created in the course of the extraction.
Settings #
Opening the Destination Settings #
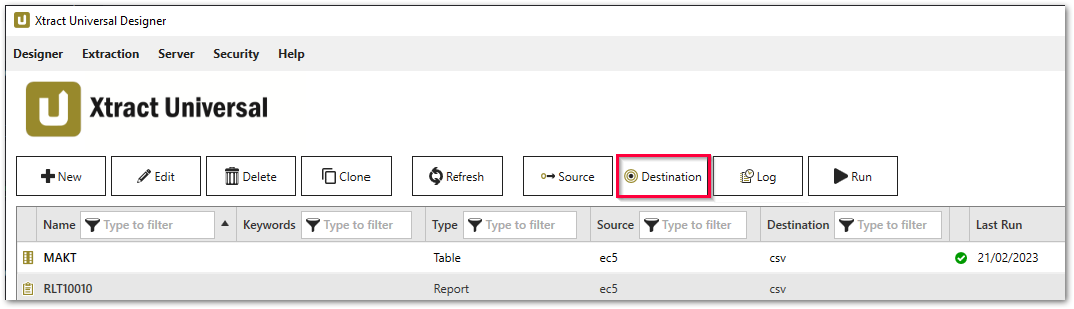
- Create or select an existing extraction, see Getting Started with Xtract Universal.
- Click [Destination]. The window “Destination Settings” opens.
The following settings can be defined for the destination:
Destination Settings #
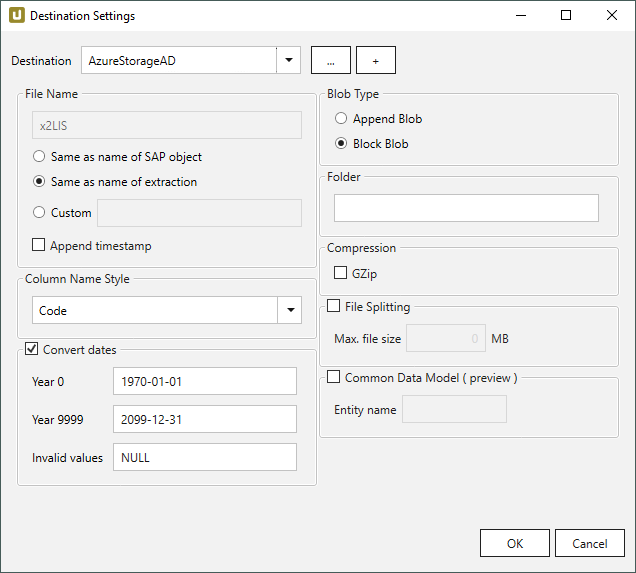
File Name #
File Name determines the name of the target table. You have the following options:
- Same as name of SAP object: Copy the name of the SAP object
- Same as name of extraction: Adopt name of extraction
- Custom: Define a name of your choice
- Append timestamp: Add the timestamp in the UTC format (_YYYY_MM_DD_hh_mm_ss_fff) to the file name of the extraction
Note: If the name of an object does not begin with a letter, it will be prefixed with an ‘x’, e.g. an object by the name _namespace_tabname.csv will be renamed x_namespace_tabname.csv when uploaded to the destination.
This is to ensure that all uploaded objects are compatible with Azure Data Factory, Hadoop and Spark, which require object names to begin with a letter or give special meaning to objects whose names start with certain non-alphabetic characters.
Using Script Expressions as Dynamic File Names
Script expressions can be used to generate a dynamic file name. This allows generating file names that are composed of an extraction’s properties, e.g. extraction name, SAP source object. This scenario supports script expressions based on .NET and the following XU-specific custom script expressions:
| Input | Description |
|---|---|
#{Source.Name}# |
Name of the extraction’s SAP source. |
#{Extraction.ExtractionName}# |
Name of the extraction. If the extraction is part of an extraction group, enter the name of the extraction group before the name of the extraction. Separate groups with a ‘,’, e.g, Tables,KNA1, S4HANA,Tables,KNA1. |
#{Extraction.Type}# |
Extraction type (Table, ODP, BAPI, etc.). |
#{Extraction.SapObjectName}# |
Name of the SAP object the extraction is extracting data from. |
#{Extraction.Timestamp}# |
Timestamp of the extraction. |
#{Extraction.SapObjectName.TrimStart("/".ToCharArray())}# |
Removes the first slash ‘/’ of an SAP object. Example: /BIO/TMATERIAL to BIO/TMATERIAL - prevents creating an empty folder in a file path. |
#{Extraction.SapObjectName.Replace('/', '_')}# |
Replaces all slashes ‘/’ of an SAP object. Example /BIO/TMATERIAL to _BIO_TMATERIAL - prevents splitting the SAP object name by folders in a file path. |
#{Extraction.Context}# |
Only for ODP extractions: returns the context of the ODP object (SAPI, ABAP_CDS, etc). |
#{Extraction.Fields["[NameSelectionFiels]"].Selections[0].Value}# |
Only for ODP extractions: returns the input value of a defined selection / filter. |
#{Odp.UpdateMode}# |
Only for ODP extractions: returns the update mode (Delta, Full, Repeat) of the extraction. |
#{TableExtraction.WhereClause}# |
Only for Table extractions: returns the WHERE clause of the extraction. |
Column Name Style #
Defines the style of the column name. Following options are available:
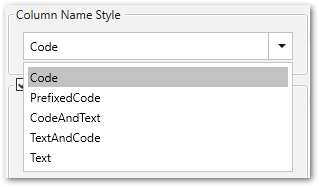
- Code: The SAP technical column name is used as column name in the destination e.g., MAKTX.
- PrefixedCode: The SAP technical column name is prefixed by SAP object name and the tilde character e.g., MAKT~MAKTX
- CodeAndText: The SAP technical column name and the SAP description separated by an underscore are used as column name in the destination e.g., MAKTX_Material Description (Short Text).
- TextAndCode: The SAP description and the SAP technical column name description separated by an underscore are used as column name in the destination e.g., Material Description (Short Text)_MAKTX.
- Text: The SAP description is used as column name in the destination e.g., Material Description (Short Text).
Date conversion #
Convert date strings
Converts the character-type SAP date (YYYYMMDD, e.g., 19900101) to a special date format (YYYY-MM-DD, e.g., 1990-01-01). Target data uses a real date data-type and not the string data-type to store dates.
Convert invalid dates to
If an SAP date cannot be converted to a valid date format, the invalid date is converted to the entered value. NULL is supported as a value.
When converting the SAP date the two special cases 00000000 and 9999XXXX are checked at first.
Convert 00000000 to
Converts the SAP date 00000000 to the entered value.
Convert 9999XXXX to
Converts the SAP date 9999XXXX to the entered value.
Blob Type #
Append Blob
Creates an Append Blob.
Block Blob
Creates a Block Blob.
Note: For both file types an MD5 hash is created upon upload to Azure storage.
Folder #
Option to create a folder structure within the container for saving files, see also Connection > Folder Path.
For creating a single folder, enter a folder name without slashes: [folder]
Subfolders are supported and can be defined using the following syntax: [folder]/[subfolder_1]/[subfolder_2]/[..]
Using Script Expressions as Dynamic Folder Paths
Script expressions can be used to generate a dynamic folder path. This allows generating folder paths that are composed of an extraction’s properties, e.g., extraction name, SAP source object. The described scenario supports script expressions based on .NET and the following XU-specific custom script expressions:
| Input | Description |
|---|---|
#{Source.Name}# |
Name of the extraction’s SAP source. |
#{Extraction.ExtractionName}# |
Name of the extraction. If the extraction is part of an extraction group, enter the name of the extraction group before the name of the extraction. Separate groups with a ‘,’, e.g, Tables,KNA1, S4HANA,Tables,KNA1. |
#{Extraction.Type}# |
Extraction type (Table, ODP, BAPI, etc.). |
#{Extraction.SapObjectName}# |
Name of the SAP object the extraction is extracting data from. |
#{Extraction.Timestamp}# |
Timestamp of the extraction. |
#{Extraction.SapObjectName.TrimStart("/".ToCharArray())}# |
Removes the first slash ‘/’ of an SAP object. Example: /BIO/TMATERIAL to BIO/TMATERIAL - prevents creating an empty folder in a file path. |
#{Extraction.SapObjectName.Replace('/', '_')}# |
Replaces all slashes ‘/’ of an SAP object. Example: /BIO/TMATERIAL to _BIO_TMATERIAL - prevents splitting the SAP object name by folders in a file path. |
#{Extraction.Context}# |
Only for ODP extractions: returns the context of the ODP object (SAPI, ABAP_CDS, etc). |
#{Extraction.Fields["[NameSelectionFields]"].Selections[0].Value}# |
Only for ODP extractions: returns the input value of a defined selection / filter. |
#{Odp.UpdateMode}# |
Only for ODP extractions: returns the update mode (Delta, Full, Repeat) of the extraction. |
#{TableExtraction.WhereClause}# |
Only for Table extractions: returns the WHERE clause of the extraction. |
#{Extraction.Fields["[0D_NW_CODE]"].Selections[0].Value}# |
Only for BWCube extractions (MDX mode): returns the input value of a defined selection. |
#{Extraction.Fields["[0D_NW_CHANN]"].RangeSelections[0].LowerValue}# |
Only for BWCube extractions (MDX mode): returns the lower input value of a defined selection range. |
#{Extraction.Fields["[0D_NW_CHANN]"].RangeSelections[0].UpperValue}# |
Only for BWCube extractions (MDX mode): returns the upper input value of a defined selection range. |
#{Extraction.Fields["0D_NW_CODE"].Selections[0].Value}# |
Only for BWCube extractions (BICS mode): returns the input value of a defined selection. |
#{Extraction.Fields["0D_NW_CHANN"].RangeSelections[0].LowerValue}# |
Only for BWCube extractions (BICS mode): returns the lower input value of a defined selection range. |
#{Extraction.Fields["0D_NW_CHANN"].RangeSelections[0].UpperValue}# |
Only for BWCube extractions (BICS mode): returns the upper input value of a defined selection range. |
Common Data Model #
If this option is enabled, a Common Data Model JSON file is generated and written to the destination alongside the extracted data.
The CDM file can be used to automate data transformation in Azure.
For more information on Common Data Models, see Microsoft Documentation: Common Data Model.
Entity name
Enter a name for the generated .cdm.json file.
Note: This option is still in preview mode.
Compression #
None
The data is transferred uncompressed and stored as a csv file.
gzip
The data is transferred compressed and stored as a gz file.
Note: Compression is only available for the csv file format, see Connection: File Format.
File Splitting #
File Splitting
Writes extraction data of a single extraction to multiple files in the cloud.
Each filename is appended by _part[nnn].
Max. file size
The value set in Max. file size determines the maximum size of each stored file.
Note: The option Max. file size does not apply to gzip files. The size of a gzipped file cannot be determined in advance.