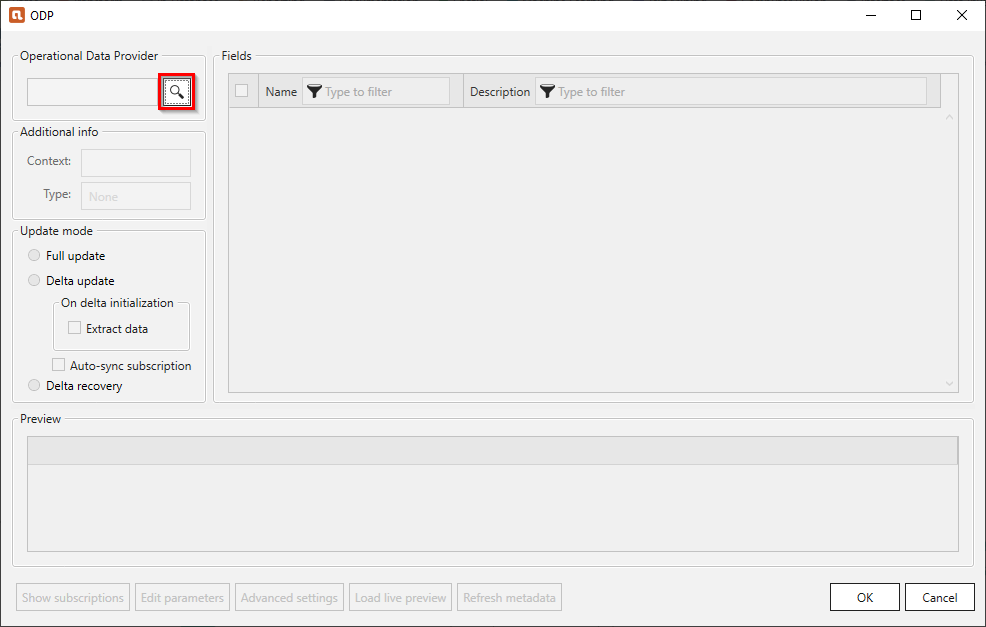
The following section shows how to use the Xtract ODP component.
Look up Data Objects #
- Click
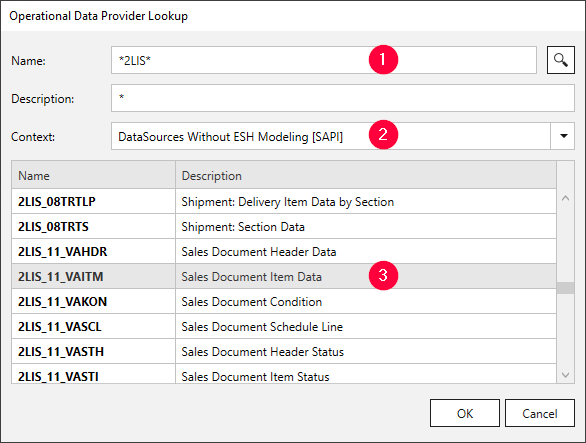
 . The window “Operational Data Provider Lookup” opens.
- Enter a name of an extractor in the field Name (1). Use wildcards (*), if needed.
-
Select a Context (2). Depending on the connected SAP source system there are differences in available provider context.
ODP context SAP Source objects ABAP Core Data Services [ABAP_CDS] - CDS Views SAP NetWeaver Business Warehouse [BW] BW/4HANA:
- DSO / aDSO
- CompositeProvider
- InfoObjects
- Query as InfoProvider
BW systems:
- CompositeProvider
- InfoCubes
- Semantically partitioned objects
- HybridProviders
- MultiProviders
- InfoSetsSAP HANA Information Views [HANA] - Analysis Views
- Calculation Views
- Associated Attribute ViewsDataSources/Extractors [SAPI] - DataSources and Extractors SAP LT Queue Alias [SLT~your_queue_alias] - SAP Tables
- Views
- Cluster tables
- Pool tables - Click and select the extractor of your choice from the displayed list (3).
- Click [OK] to confirm your input.
The application now returns to the main window of the component.
Note: To find DataSources, they have to be activated in SAP.
Define an ODP Extraction #
- Optional: Create selections by activating or deactivating fields (4).
To add filters click the [Edit] option next to the fields. If your data source is a Hierarchy, see Select Hierarchy for filter options. - Optional: To create delta extractions, select the corresponding Update Mode.
- Click [Load live preview] (5) to display a live preview of the data without executing an extraction.
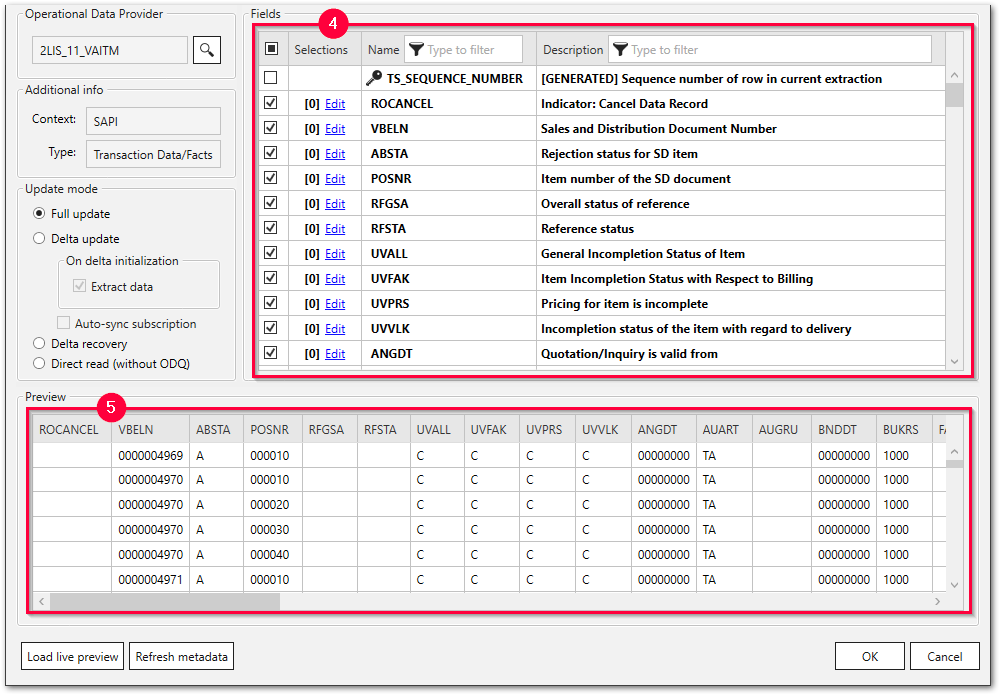
- Before executing an extraction, check the extraction settings.
Update Mode #
Full update:
Extracts the data in full mode
Note: The Delta update option is ready for input only if the ODP provider in the SAP source system supports delta updates.
Delta update:
Runs a delta initialization, if no delta initialization is available for selected subscriber. Runs a delta update, if there is a delta initialization for the selected subscriber.
- Extract data
Allows extracting data when running a delta initialization. Leaving this checkbox unchecked runs a delta initialization without extracting data. - Auto-sync subscription
Allows deletion of the existing subscription and creates a new subscription, if required. Each extraction has an internal ID, which is part of the subscriber. If you change the filter of an extraction after the delta initialization, the Auto-sync subscription option automatically deletes the existing subscription and creates a new one. A subscription is deleted, if the error message “Illegal change in selection parameters” returns from the SAP system.
Delta recovery:
Re-runs the last delta update
Direct read (without ODQ):
Directly reads all available data, bypassing the ODQ (Operational Delta Queue). Direct read is the only update mode that supports data aggregation functions (Maximum, Minimum and Sum).
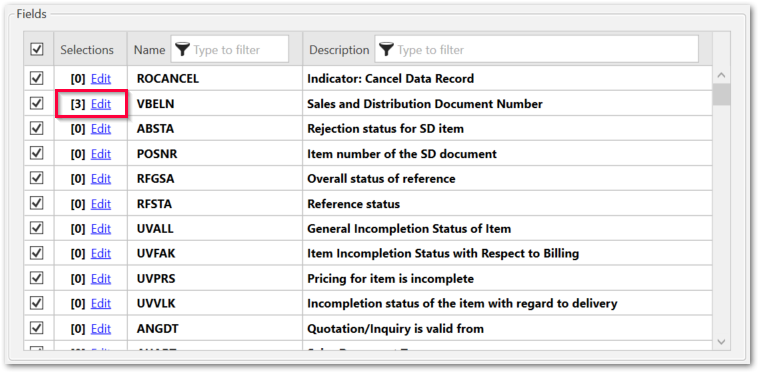
Edit Selections #
Follow the steps below to edit selection fields and filter data:
- Click [Edit] next to the selection field you want to edit. The window “Edit selection” opens.
- Add one or more of the following filter types:
a) Click [Single] to compare the data to a single specified value.
b) Click [Range] to check if the data is (not) within a specified range of values.
c) Click [List] to check if the data is (not) part of a specified list of values. - In the Sign column (1), select Include to add the filtered data to the output or select Exclude to remove the filtered data from the output.
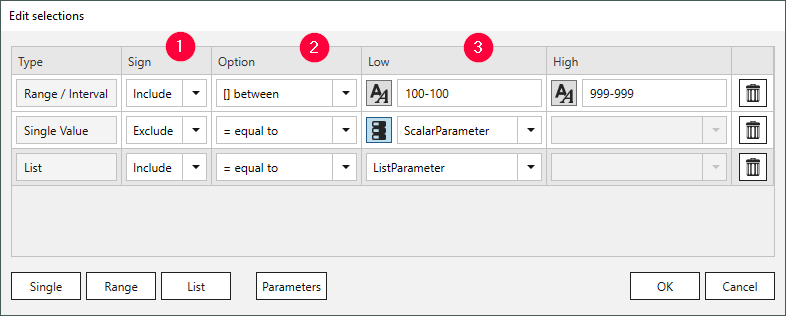
-
Select an operator in the Option column (2). The operator filters data according to the table below.
Operator Meaning (not) like pattern True if data values do (not) contain to the content of operand 1.
Not not all ODP contexts and data sources support this option.(not) equal to True if data is (not) equal to the content of operand 1. at least True if data is greater than or equal to the content of operand 1. more than True if data is greater than the content of operand 1. at most True if data is less than or equal to the content of operand 1. less than True if data is less than the content of operand 1. (not) between True if data values do (not) lie between the values of operand 1 and operand 2. elements of True if data values are part of operand 1. This option is only available for type List. - Enter values or assign runtime parameters to the selection fields (3).
a) Static values: Enter values directly into the Low and High input fields. If runtime parameters are available, make sure that the icon is displayed next to the input field.
Clicking on the icon switches between static and dynamic input values.
icon is displayed next to the input field.
Clicking on the icon switches between static and dynamic input values.
b) Runtime parameters: Click to change the input type to dynamic values  .
Select an existing runtime parameter from the drop-down list.
.
Select an existing runtime parameter from the drop-down list. - Click [OK] to confirm your input.
- Click [Load Preview] in the main window of the component to check the result of your selection.
If runtime parameters are defined, you are prompted to populate the parameters with actual values.
The number of defined filters is displayed in square brackets next to the Edit option.